
3D Printed Battery Recharge Dock for Parrot Rolling Spider
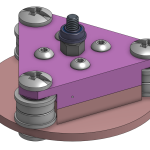
I got a Parrot Rolling Spider for fun. The batteries are 570mAH and the life is under 10 minutes, plus the reviews often mention that the batteries will lose their capacity quickly. Further research into this problem indicated that charging them slowly will alleviate this problem. I wanted a few spare batteries and a way to recharge them. I decided to DIY a dock for them. I had a handful of spare parts, such as the MCP73831 and plenty of small perfboards. All I needed to do was 3D print something to hold the batteries in place, and this is what I came up with. More pictures if you continue reading. The red LED is always on as long as there is power. When a battery is done recharging, a green LED will turn on. The MCP73831 are configured to charge at a slow 200mA each, totalling 400mA, which is under the 500mA limit for low power USB ports. Sure… I could’ve probably fit 6 batteries onto one board, standing vertically. But I didn’t want to actually buy 6 batteries for a toy. Sorry, no circuit diagram was drawn prior to the rapid prototype, but it’s nearly identical to the example circuit inside the MCP73812 datasheet. The battery connector is a 2199011-1 from TE Connectivity, or A120576 on Digi-Key. The design is shared on Onshape, click here. Print at around 27% infill and 1.2mm wall thickness. The…
3D Printed Peristaltic Pump
I 3D printed a very durable peristaltic pump. It is capable of pumping very thick liquids at as much pressure as the tube can handle. It is durable because it is printed at 100% infill at high thicknesses and uses steel ball bearings. It is capable of such strength because it is using a massive 12V DC brushed motor that has a 150:1 gear ratio metal gear box, which means several kilograms of torque. For design files and more details, please continue reading. Purpose: My grandfather (living in China) has esophagus cancer and needs to eat through a feeding tube. The liquid food he needs to eat is quite thick, and it is usually pushed through a syringe. But this takes a lot of strength and me, my dad, and my uncle are the ones doing this. But I live in the USA, my dad lives in Canada, and my uncle is in China and don’t have any more days off, meaning my grandmother needs to feed my grandfather. My grandmother does not have the strength to push the thick liquid through the syringe. So hence I decided to build a pump for them. 3D Print: The biggest challenge here is caused by the fact that the plastic is printed hot and then cools during the print. This means there’s some shrinkage, which causes bed adhesion problems (corners lifting during print, my new solution click here) and dimensional…
3D Printed All-In-One Mechanical Iris Dome
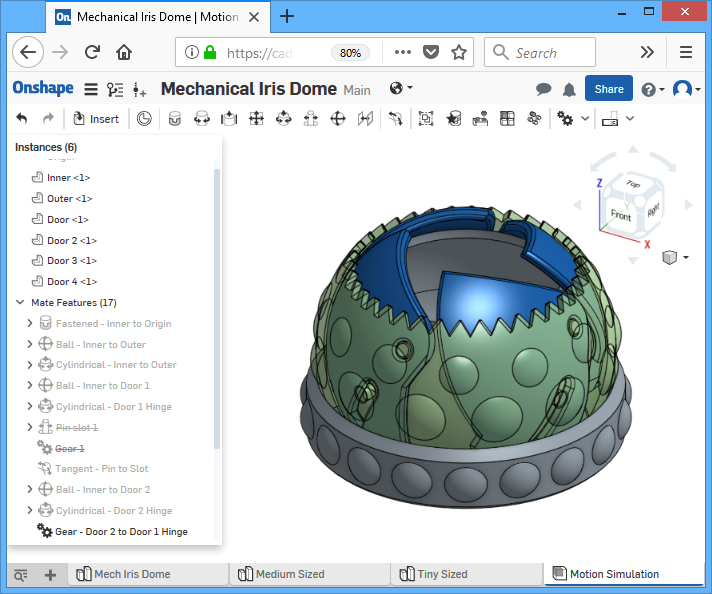
It’s that time of year when we think about gift giving. I decided to design a dome shaped box that opened with moving curved doors. (dear iPhone users, sorry if the videos don’t work for you, please consider upgrading) Keep reading for more pictures and a full tutorial teaching you how to create this in CAD. What makes this extra cool is that all of this is 3D printed as one piece, there is no assembly required! I will show you how I designed this, step by step (plus why I did it that way), using a mechanical 3D modelling CAD tool called Onshape. I will focus on the things that showcase the power of a “parametric feature based modeling” CAD tool, and how it eliminated some of the problems me and other people have faced with other similar designs. When I modeled this design, I paid extra attention for the dimensions to be adjustable without compromising the 3D-printability of the design. Simple Explainations First, take a good look at the animation of how this box actually works. There are two shells that sandwich a set of door pieces. The door pieces rotate about a hinge that protrudes from the inner shell. The door pieces also have a slot that bounds a pin, the pin protrudes from the outer shell. As the outer shell rotates clockwise, the pin pushes against the slot, causing the door to rotate upwards.…


