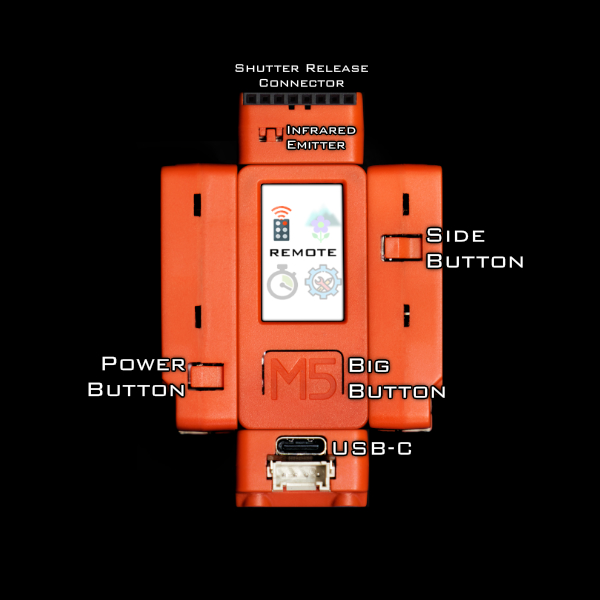
Wireless Camera Controller:Alpha-Fairy
I made(*) this tiny remote control for Sony Alpha cameras. Preface This is an open source firmware project. I wrote the source code for this project in Arduino flavored C++ and I am sharing it on GitHub. (*)I did not design the hardware nor do I offer it for sale. GitHub project main page Instructions for building and usage Features Minor Features Full Menu Map: The Story and the Challenge A while ago I owned a camera that was before bird tracking auto-focus was a well implemented feature, but got super envious when the Sony A1 was released. I ended up adding bird tracking to the camera myself, using a Google Coral to accelerate a simple pretrained neural network to point out birds and move the focusing point around on the camera. That project involved some reverse engineering of the Picture Transfer Protocol (aka. PTP) that is used by Sony between their camera and their PC app. Then I got interested in macro photography. There’s a technique in macro photography called Focus Stacking that I wanted to use but it’s a bit of a pain, some other camera brands offer this features in-camera, but not Sony. Knowing that it can be implemented with some commands over PTP, I wanted to add this feature to the camera as an external accessory. But this time it had to be a tiny battery powered wireless device. Here’s a demo video of Alpha Fairy doing focus…
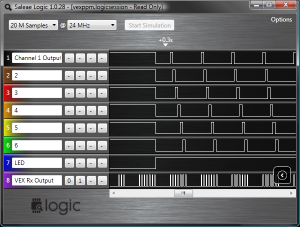
VEX Pulse Position Modulation Wireless Signal Decoder
1 Reply This is a PPM signal splitter for use with the VEX radio transmitter/receiver kit sold at All Electronics (item is now gone from their web site, this article itself is extremely old and outdated because newer technology has arrived) For $30 at All Electronics, you can buy a 6 channel radio transmitter and receiver. The transmitter is excellent for $30, trim, scaling, mixing are all programmable on the transmitter itself and it stores several configurations. The receiver only has one output pin, which outputs a PPM signal which needs to be split into individual channels in order to be able to control servos. If you put the receiver right side up and with the socket facing you, the pin on the far left is the Vdd pin, connect this to a regulated 5 volt power supply, the middle left pin is the PPM output pin (it is open collector so a pull up resistor is needed), and the middle right pin is the Vss pin, connect this to your circuit’s ground, the far right pin is not connected to anything inside the receiver. The 6 channel PPM signal has 7 periods of high and low pulses, each of these pulses all start with a high period of 500 microseconds, and a low period of varying lengths. The first low period is a sync pulse with a fixed low period of about 7 milliseconds, this…
Beamo Laser Cutter Review
I finally took the plunge and bought myself my very own laser cutter! It’s a cute little Flux Beamo! A small but modern 30W CO2 CNC laser cutter/engraver. Here’s what I think of it… The Flux Beamo claims to output 30W of optical power at 10.6um wave length. The workspace area is about the size of a sheet of paper, 300mm x 210mm. It has modern features such as a touch screen, camera preview, and WiFi. It can also be upgraded with a “autofocus” attachment, and a rotary attachment. It also advertises to be capable of 1000 DPI of resolution, meaning each pixel is 0.02mm, which is half bull****, the stepper motors are capable of that sort of resolution but the laser beam itself is larger (depends on focus and settings and the area of material being melted), all CO2 lasers are like this. The capabilities of the laser is supposed to be enough to cut and etch clear acrylic. Other “easy” materials like wood and leather it’ll have no problems with. It also claims to be able to etch glass, and even stainless steel if you coat the steel with a special coating first. 30W is still on the weaker end of the market, it means the cut depth isn’t very thick and the speed will be slower, but these are problems that can be mitigated or ignored. Out of the box, it worked, I…
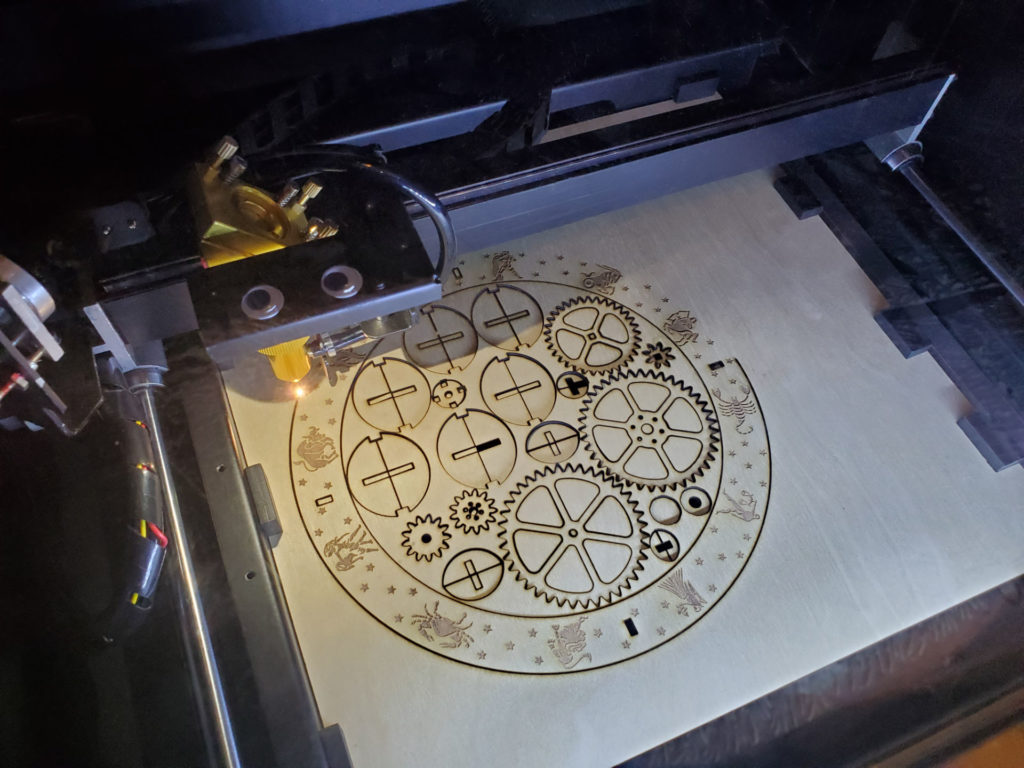
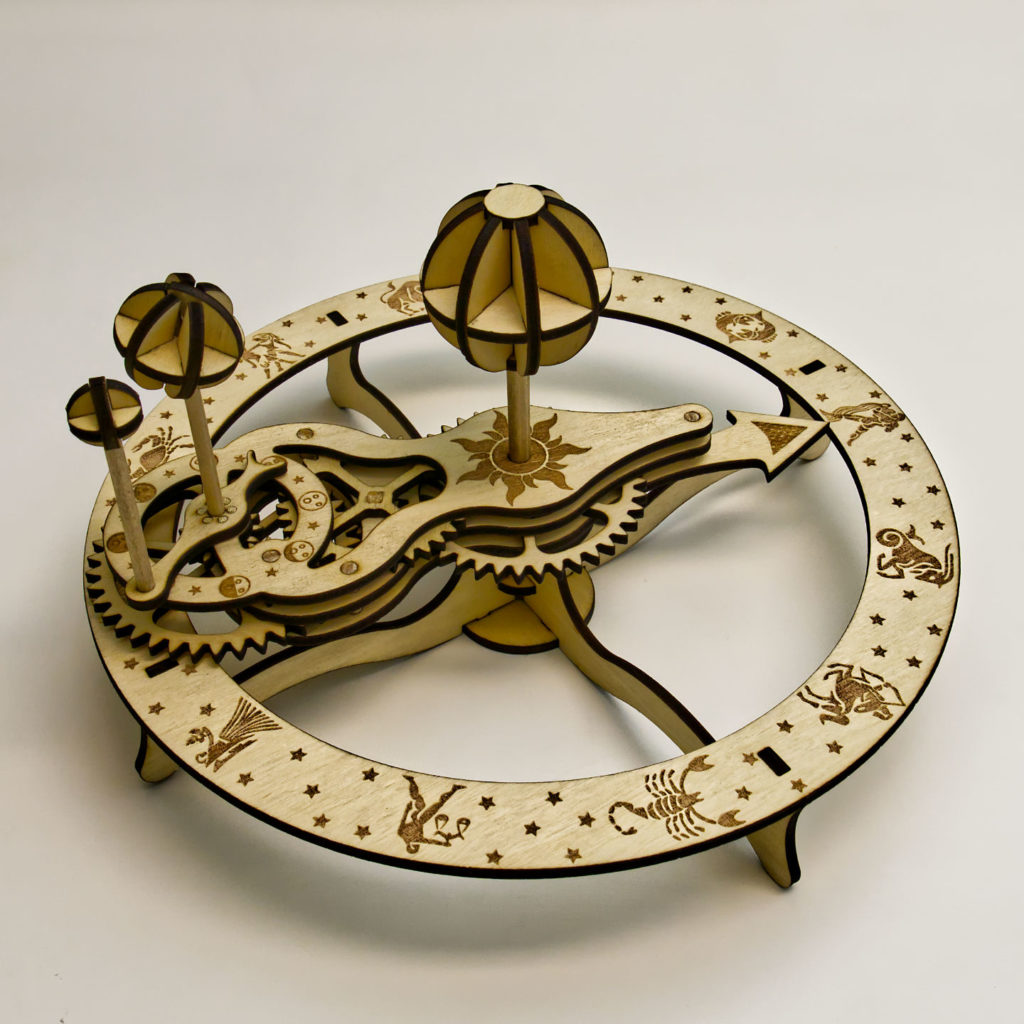
Wooden Orrery: Laser Cut Project
Orrery – Laser Cut Wood Project 5 Replies I’m having so much fun with my new Beamo laser cutter! I designed and made this wooden orrery with my Beamo. It’s a mechanical toy that depicts the position of the Earth and Moon as they orbit each other and the Sun, with artwork showing the moon phases and Zodiac. See more pictures and animation: All files are open source and available on my GitHub repo (click here)! I have provided the two SVG files to be cut on the laser cutter, optimized for the Beamo but should work on any other laser. The 3D models I designed using SolidWorks is also available. Assembly instructions are provided in the repo as well. Originally designed in SolidWorks. The parts were then exported to SolidWorks drawing files, then exported to DXF files, then imported into Inkscape to be edited as SVG files. Inside Inkscape, paths were joined together to optimize cutting. Paths that represented circles, squares, and slots, were converted into basic shapes so cut tolerances can be adjusted. Finally, the cutting order was organized into layers. Beam Studio will import the layers in the order you defined them. I learned the hard way that you need to make inner cuts first before outer cuts. Otherwise, if you do an outer cut first, the piece will move after being cut free and fall onto the laser’s honeycomb bed. This means the inner cut…
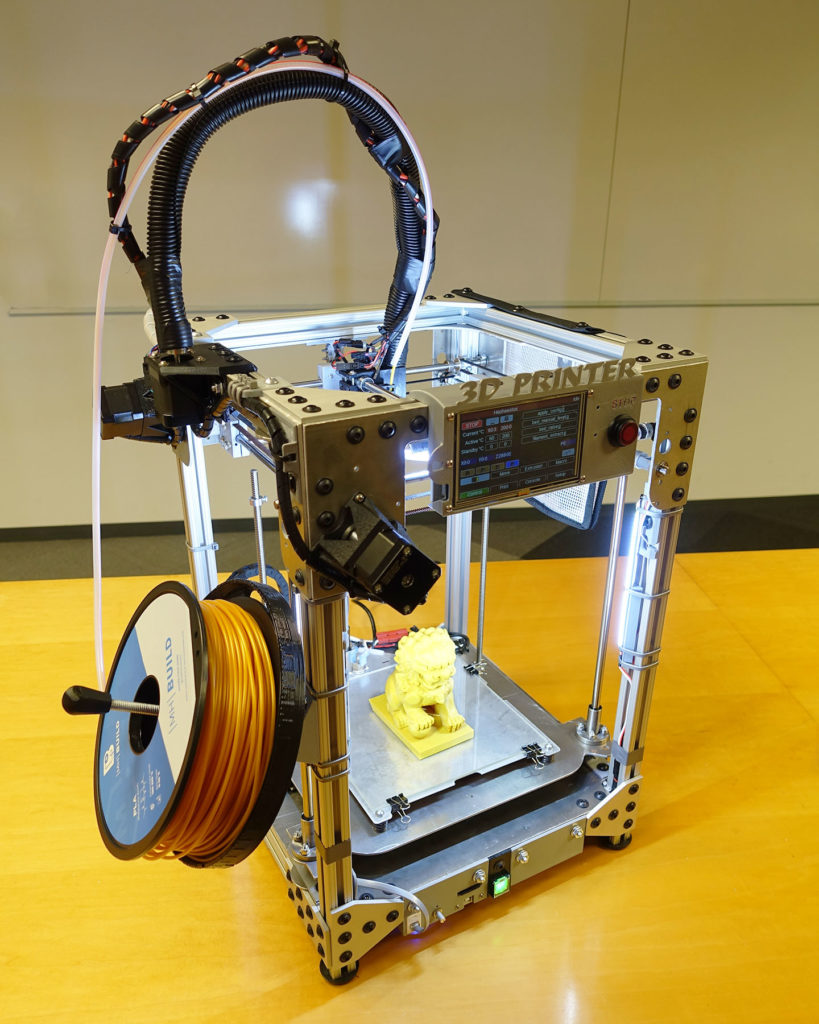
my own 3D printer
I finally did it, I designed and built my own 3D printer. This is in no way “the best 3D printer”. Instead, this was an epic and nightmare project that exercised my ability to engineer and build my own CNC machine. Along the way, I figured out what I did well and what I did badly, mistakes were made and sometimes fixed, even ignored. This 3D printer is named Haphaestus. This wasn’t some kit that I purchased and put together, this wasn’t some tutorial I downloaded and followed. I designed almost everything about this printer and built it with tools I own and a waterjet cutting service. The only application specific parts I didn’t design are the Duet controller circuit and the E3D Titan parts. NOTE: This is not an open source project where I will let you download a few files so you can build one yourself, trust me… you don’t want to. It’ll be a logistical nightmare to just organize the files and BOM to the point where it is useful to anybody else. This page will be dedicated to recording my experiences and analysis of the first 3D printer I have ever designed and built all by myself. More pictures of prints near the bottom of this page! Features and Performance Theoretical Print Resolution I don’t have measurement tools that I can use to make real tolerance claims. I’m using mostly the same…
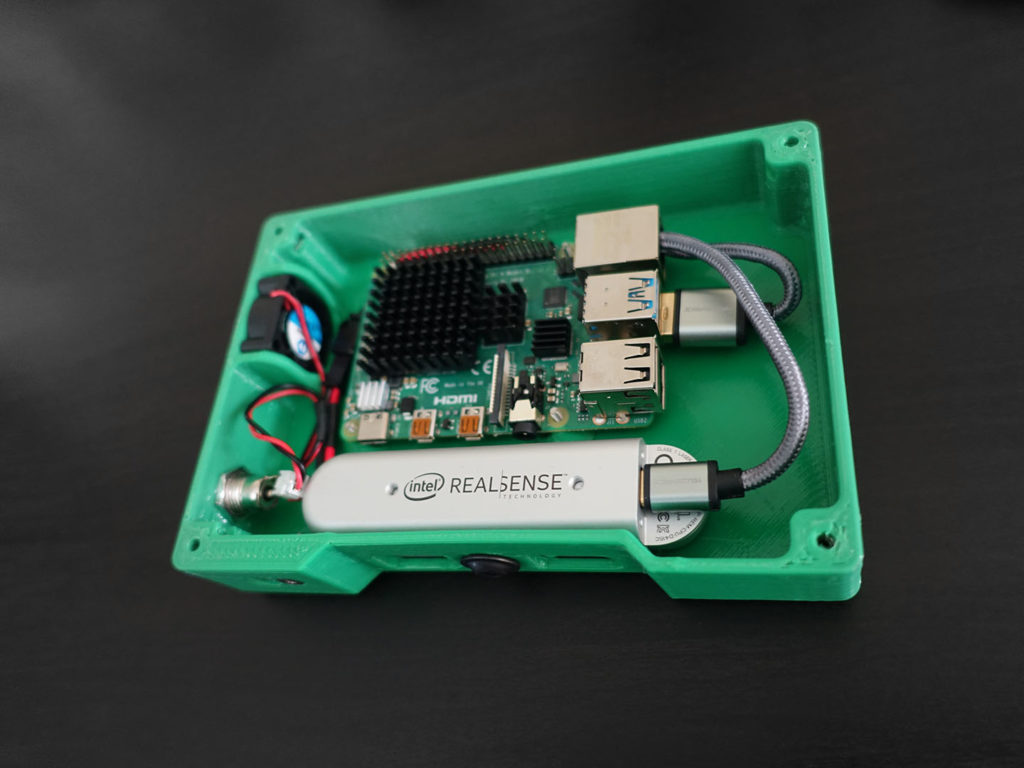
Handheld 3D Scanner: Based on Raspberry Pi
I’ve had some fun with photogrammetry recently and wanted to try out other techniques for 3D scanning. I’ve actually sort of accomplished S.L.A.M. during a hackathon using the PlayStation 4 camera and the Xbox One Kinect already, but I wanted something portable! With the new Raspberry Pi 4 debuting this year, I can finally accomplish this… sort of… Inside this 3D printed case is a Raspberry Pi 4 and a Intel RealSense D415 camera. The D415 is a depth sensing camera, using active stereo IR cameras and an internal processor to generate depth map data. It also has an ordinary RGB camera as well. That’s a lot of data to push through, hence why the newest Raspberry Pi 4 this year is important, because it has USB 3.0 ports that can handle all that data. (the ARM processor inside also has a faster architecture than before) How does the depth sensing work? Have you read my post on photogrammetry yet? There are some overlaps between the techniques. There are two IR cameras spaced apart, and it can see two very similar but shifted images. The processor finds interesting points (i.e. feature extraction) in the two images that are similar and match them up, the coordinates of these points can be used to calculate the 3D coordinates of those points relative to the cameras (i.e. binocular disparity). Why infrared? When there are not a lot of interesting features for the processor to look at, the…

ARUCI Project: Our Fourth Year Design Work
We turned my phone into a universal remote that uses augmented reality. We can track the location of objects and identify them in real time, so we can overlay an icon representing the object on the video shown on the touchscreen. Simply click on the object to interact with it. It’s all wireless, no base station required. Actual video is 1080p, I recommend you view it full screen. Presentation slides: without notes and with notes Photos:http://imgur.com/a/oRjll Our group did circuit and PCB design, we did the soldering, we designed the phone casing, we designed all the IR and RF protocols, we wrote our own firmware and Android app. We have many visions on how to improve our system. We know how to improve our noise and interference immunity, plus increase the tracking speed performance. We have several ideas on how to make the phone-attached-circuit less bulky. We know how to use multiple emitters to estimate the object’s size and orientation. We are trying to gauge interest in our project, to see whether or not to continue the project, and in which direction to take it in. Abstract (exactly as we submitted it) Augmented reality provides individuals with a virtually enhancedmethod of viewing and interacting with the world around them. TheAugmented Reality Universal Controller and Identifier (ARUCI) is areal-time system that integrates remote object control with augmentedreality to view and control various objects through an interactivevisual interface that can be…
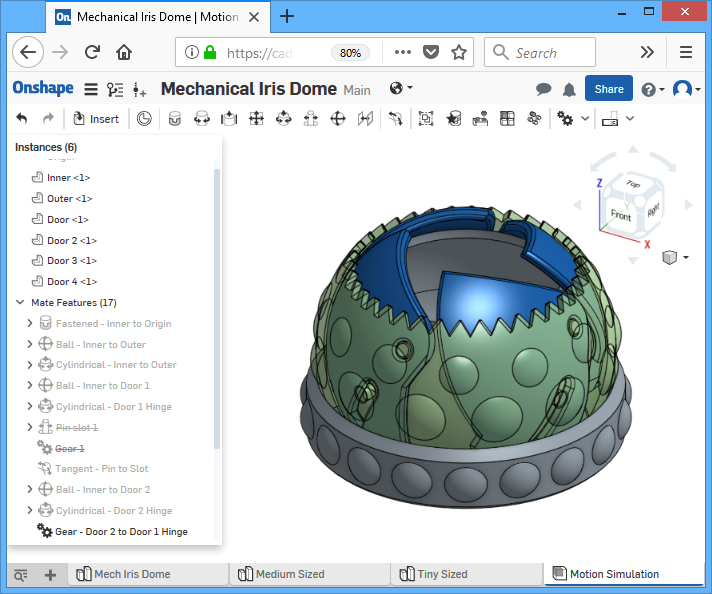
3D Printed All-In-One Mechanical Iris Dome
It’s that time of year when we think about gift giving. I decided to design a dome shaped box that opened with moving curved doors. (dear iPhone users, sorry if the videos don’t work for you, please consider upgrading) Keep reading for more pictures and a full tutorial teaching you how to create this in CAD. What makes this extra cool is that all of this is 3D printed as one piece, there is no assembly required! I will show you how I designed this, step by step (plus why I did it that way), using a mechanical 3D modelling CAD tool called Onshape. I will focus on the things that showcase the power of a “parametric feature based modeling” CAD tool, and how it eliminated some of the problems me and other people have faced with other similar designs. When I modeled this design, I paid extra attention for the dimensions to be adjustable without compromising the 3D-printability of the design. Simple Explainations First, take a good look at the animation of how this box actually works. There are two shells that sandwich a set of door pieces. The door pieces rotate about a hinge that protrudes from the inner shell. The door pieces also have a slot that bounds a pin, the pin protrudes from the outer shell. As the outer shell rotates clockwise, the pin pushes against the slot, causing the door to rotate upwards.…
Intelligent Waste Sorting System
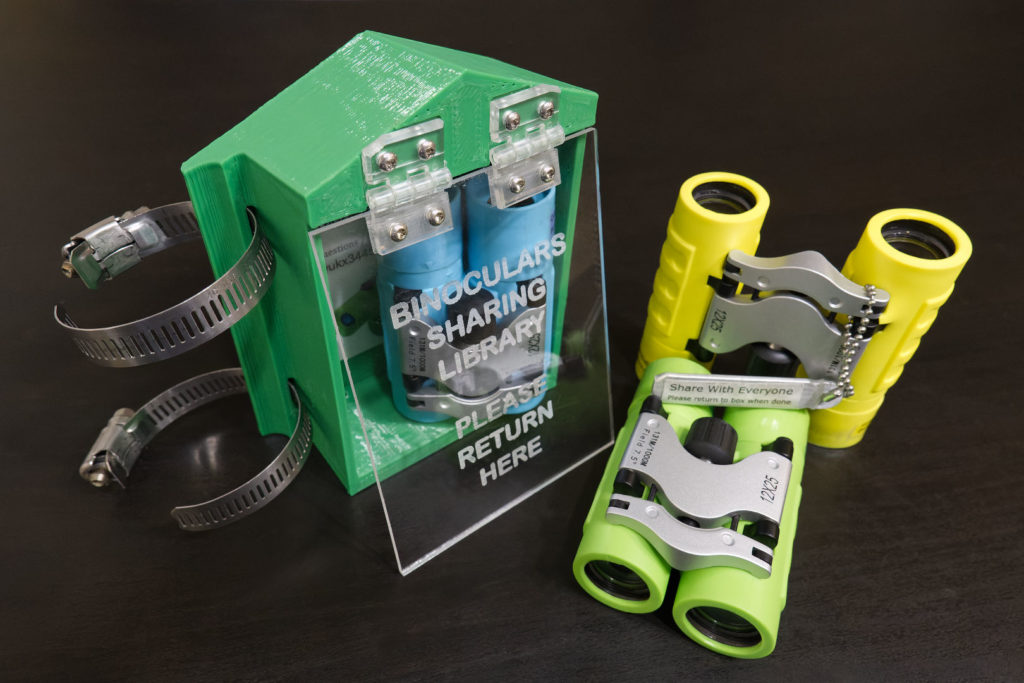
You might be enjoying a trip to the Pacific coast one day, hoping to see some whales, and stumble upon this… just felt like doing a little nice thing for the world… …in my own way, proudly made on my Hephaestus and my Beamo Welcome to the trail leading up to Mori Point! One of my favorite places… Bonus: some gifts to the library I volunteer at During the madness that is 2020, I was fortunate enough to be able to enjoy the outdoors more. At one point, I got some really nice binoculars, and they felt like a superpower! I have been letting people use my binoculars at a local whale-watching spot, and I’ve gotten some great reactions. So I decided that some binoculars should just be there for everybody to use (no coins required!). Conveniently, there’s a fence post up on the cliff, and also a little-free-library at the hiking trail entrance! For the fence post, I designed a little house to for the binoculars to live in! It’s made of 3D printed PETG plastic and the cover is clear acrylic plastic with the text laser engraved. Of course I totally expect these to be stolen, broken, vandalized, bitten, or thrown off the cliff… I shopped around for some small cheap $20 binoculars, cheap since I’ll be replacing them quite frequently. In my shopping, I got curious about some playfully coloured ones that claim to have 12x zoom. What…


