 Aquarium Computer
 Ultimaker2 Bearing Spool and Bearing Guide Upgrade
 3D Printed Battery Recharge Dock for Parrot Rolling Spider
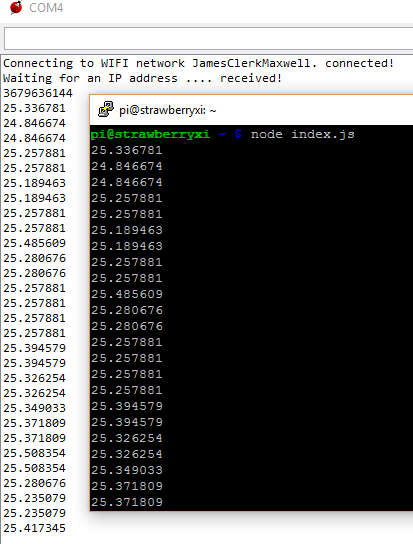
 Using a Laptop as a Monitor for a Headless Raspberry Pi
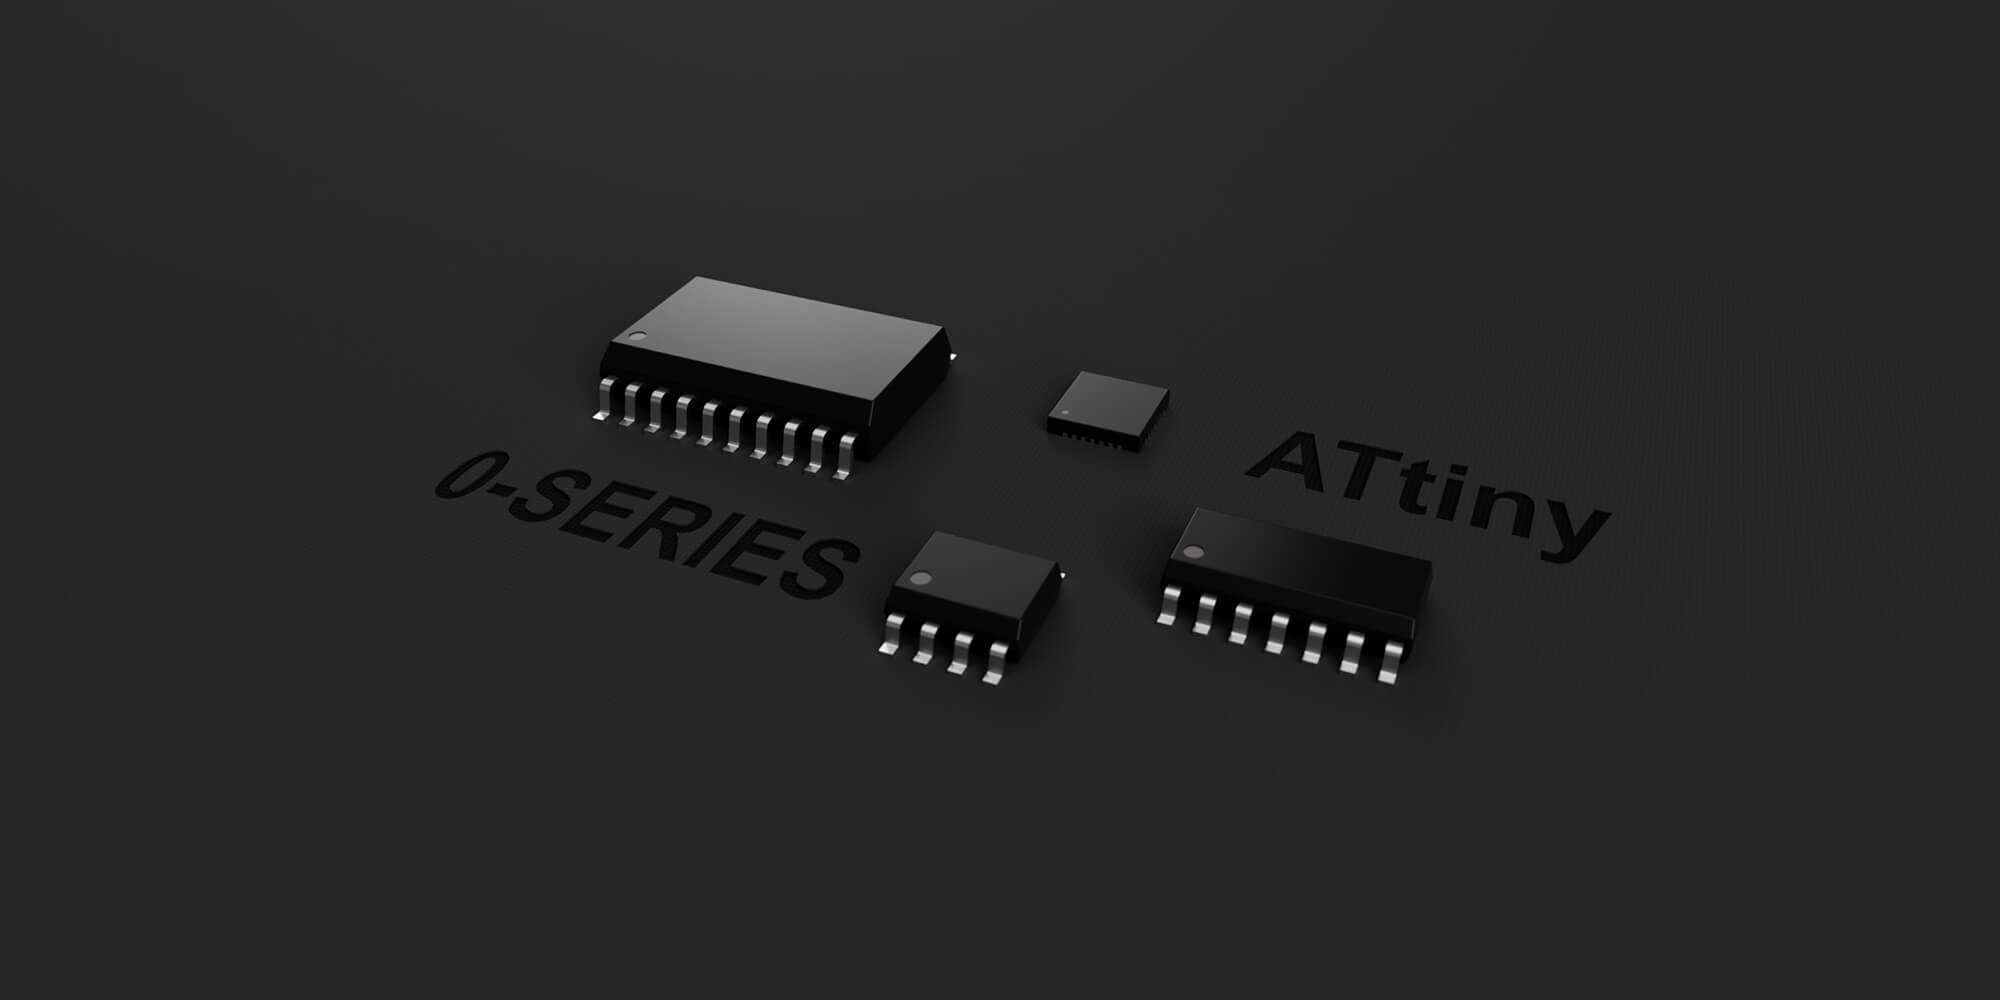 Introduction to tinyAVR Microcontroller Attiny404 Architecture, Features, and Related Registers with a Simple Code Example
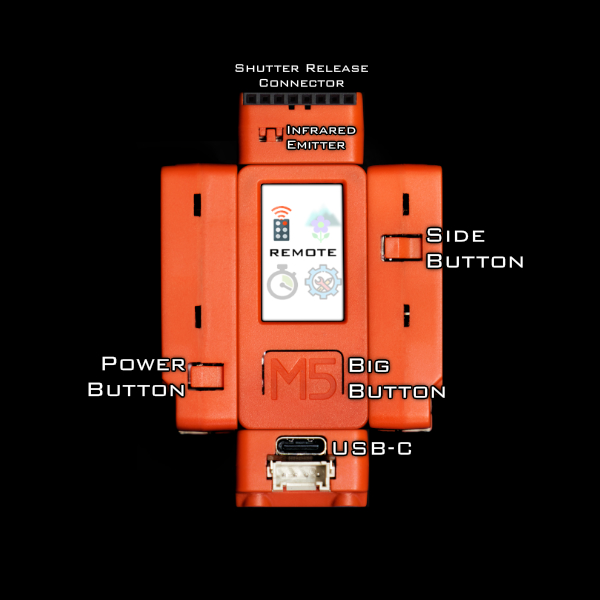 Wireless Camera Controller:Alpha-Fairy
 Toaster Oven Conversion: A DIY Reflow Soldering Solution
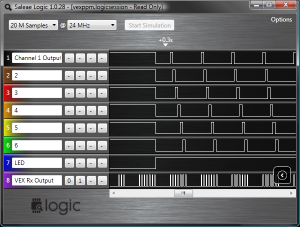 VEX Pulse Position Modulation Wireless Signal Decoder
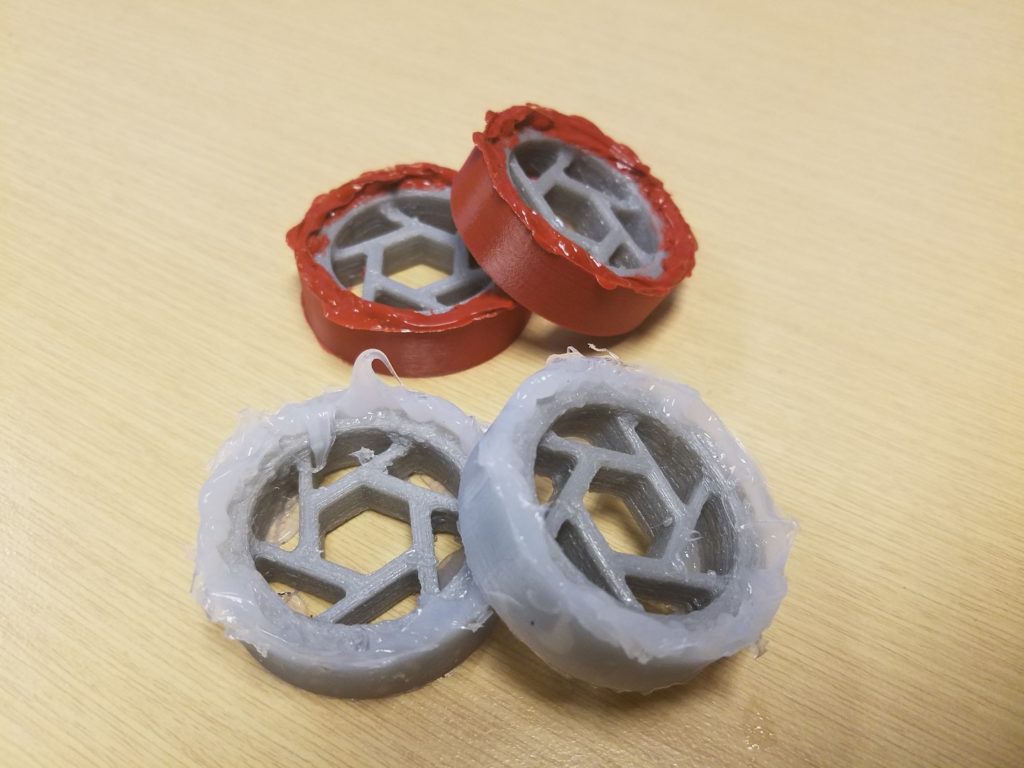


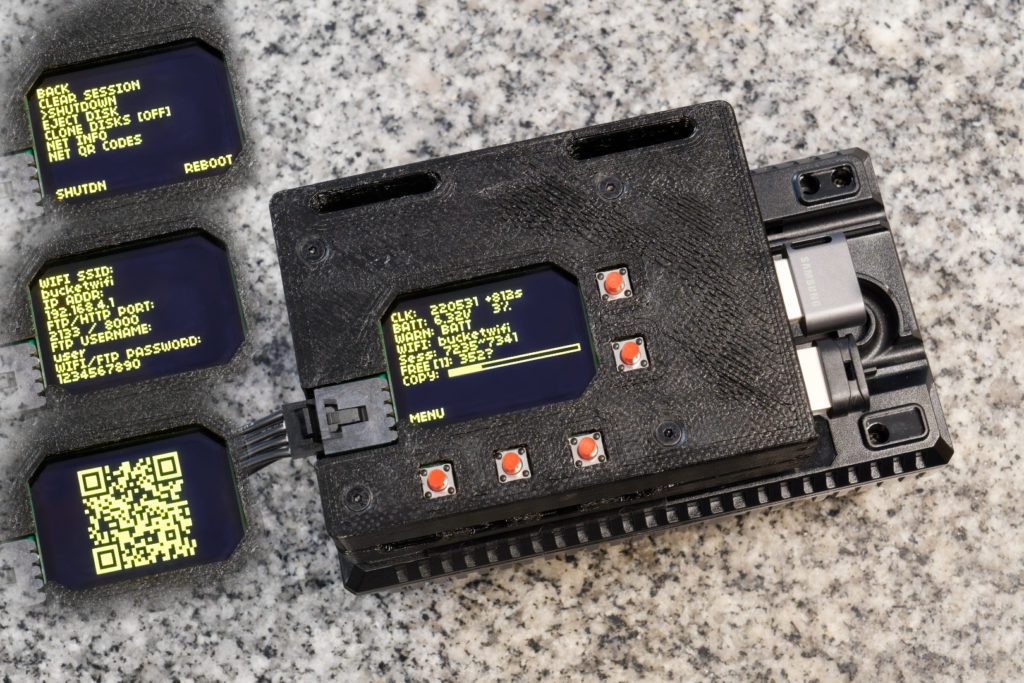
Bucket: Intelligent Photo Backup and Selector
This is a tool made to transfer and backup photos from a professional camera while in-the-field. Built with a Raspberry Pi 4 (other Pis will work too, it’s all just Python code), using Wi-Fi for file transfers and USB disks for file storage, powered by batteries. While on photography trips, I’m running out of storage on my camera’s memory cards. They are expensive memory cards and I can’t buy too many of them ($400 for 160 GB, and the camera needs two). I don’t want to go back to a hotel before clearing out a memory card either. So the strategy is to wirelessly transfer the files into a cheaper-slower-but-bigger storage device (TB sized USB disks) simultaneously as the camera is shooting. The slower speed should be fine because the transfers will happen during the down-time, when I’m walking around not taking pictures. USB disks at this size typically cost just a bit over $100 (genuine, authentic, non-scam ones) and require USB-3.0 ports. Once the photos are in the bigger storage device, I can clear the expensive-and-smaller memory cards without going back to a hotel, using in-camera quick-reformat. This project needs to be done by late June of 2022, my next vacation. (I hope this explains some very weird decisions I’ve made) Features ♦ Runs as a FTP server for professional cameras to transfer photos into. A redundant copy of the photo is made if 2…
Beamo Laser Cutter Review
I finally took the plunge and bought myself my very own laser cutter! It’s a cute little Flux Beamo! A small but modern 30W CO2 CNC laser cutter/engraver. Here’s what I think of it… The Flux Beamo claims to output 30W of optical power at 10.6um wave length. The workspace area is about the size of a sheet of paper, 300mm x 210mm. It has modern features such as a touch screen, camera preview, and WiFi. It can also be upgraded with a “autofocus” attachment, and a rotary attachment. It also advertises to be capable of 1000 DPI of resolution, meaning each pixel is 0.02mm, which is half bull****, the stepper motors are capable of that sort of resolution but the laser beam itself is larger (depends on focus and settings and the area of material being melted), all CO2 lasers are like this. The capabilities of the laser is supposed to be enough to cut and etch clear acrylic. Other “easy” materials like wood and leather it’ll have no problems with. It also claims to be able to etch glass, and even stainless steel if you coat the steel with a special coating first. 30W is still on the weaker end of the market, it means the cut depth isn’t very thick and the speed will be slower, but these are problems that can be mitigated or ignored. Out of the box, it worked, I…
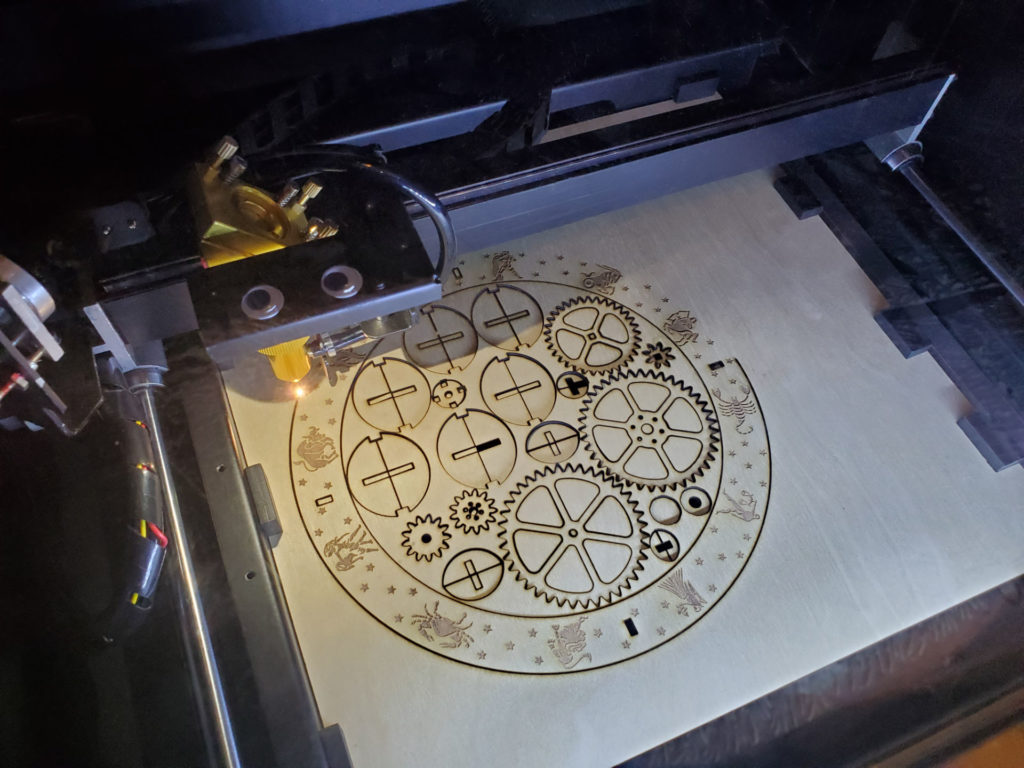
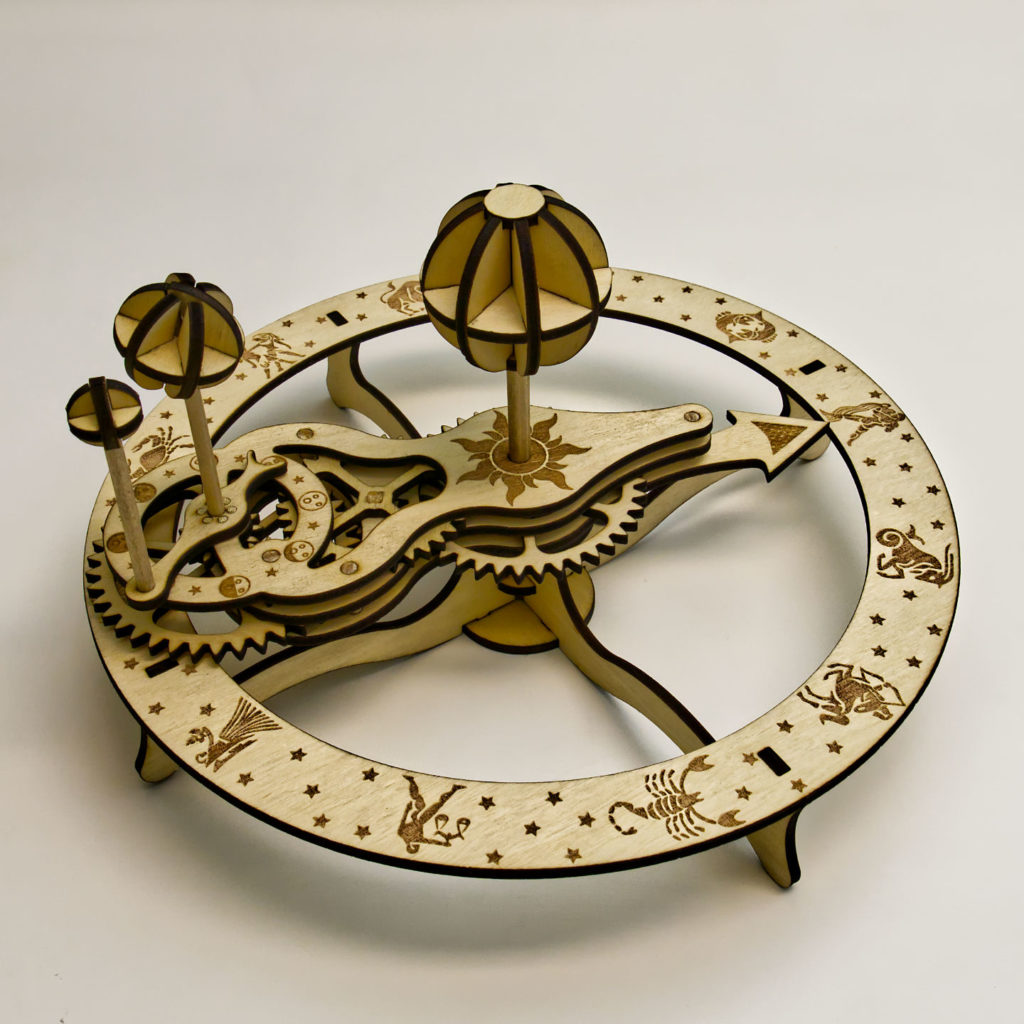
Wooden Orrery: Laser Cut Project
Orrery – Laser Cut Wood Project 5 Replies I’m having so much fun with my new Beamo laser cutter! I designed and made this wooden orrery with my Beamo. It’s a mechanical toy that depicts the position of the Earth and Moon as they orbit each other and the Sun, with artwork showing the moon phases and Zodiac. See more pictures and animation: All files are open source and available on my GitHub repo (click here)! I have provided the two SVG files to be cut on the laser cutter, optimized for the Beamo but should work on any other laser. The 3D models I designed using SolidWorks is also available. Assembly instructions are provided in the repo as well. Originally designed in SolidWorks. The parts were then exported to SolidWorks drawing files, then exported to DXF files, then imported into Inkscape to be edited as SVG files. Inside Inkscape, paths were joined together to optimize cutting. Paths that represented circles, squares, and slots, were converted into basic shapes so cut tolerances can be adjusted. Finally, the cutting order was organized into layers. Beam Studio will import the layers in the order you defined them. I learned the hard way that you need to make inner cuts first before outer cuts. Otherwise, if you do an outer cut first, the piece will move after being cut free and fall onto the laser’s honeycomb bed. This means the inner cut…

Geeky Stained Glass
It’s nearly Christmas again! I’ve started to learn a new craft, an ancient one, and started to mix it up with modern technology. Behold, stained glass suncatcher with embedded LEDs This is essentially black magic to most glass artists and a huge “duh” moment to all the makers and engineers. I’ve been asked to teach how this is done… Just a teaser preview of my second project Before I start talking about the geeky part, I’d like to summarize the basic steps in making a basic piece of stained glass artwork like this:
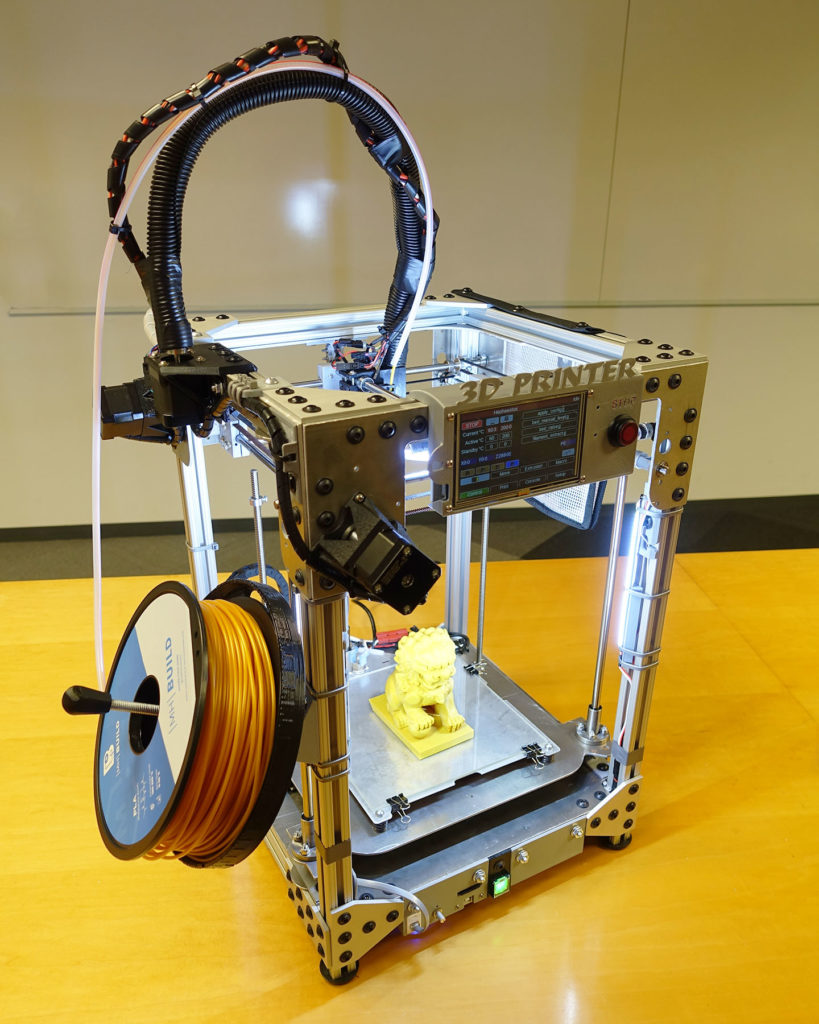
my own 3D printer
I finally did it, I designed and built my own 3D printer. This is in no way “the best 3D printer”. Instead, this was an epic and nightmare project that exercised my ability to engineer and build my own CNC machine. Along the way, I figured out what I did well and what I did badly, mistakes were made and sometimes fixed, even ignored. This 3D printer is named Haphaestus. This wasn’t some kit that I purchased and put together, this wasn’t some tutorial I downloaded and followed. I designed almost everything about this printer and built it with tools I own and a waterjet cutting service. The only application specific parts I didn’t design are the Duet controller circuit and the E3D Titan parts. NOTE: This is not an open source project where I will let you download a few files so you can build one yourself, trust me… you don’t want to. It’ll be a logistical nightmare to just organize the files and BOM to the point where it is useful to anybody else. This page will be dedicated to recording my experiences and analysis of the first 3D printer I have ever designed and built all by myself. More pictures of prints near the bottom of this page! Features and Performance Theoretical Print Resolution I don’t have measurement tools that I can use to make real tolerance claims. I’m using mostly the same…
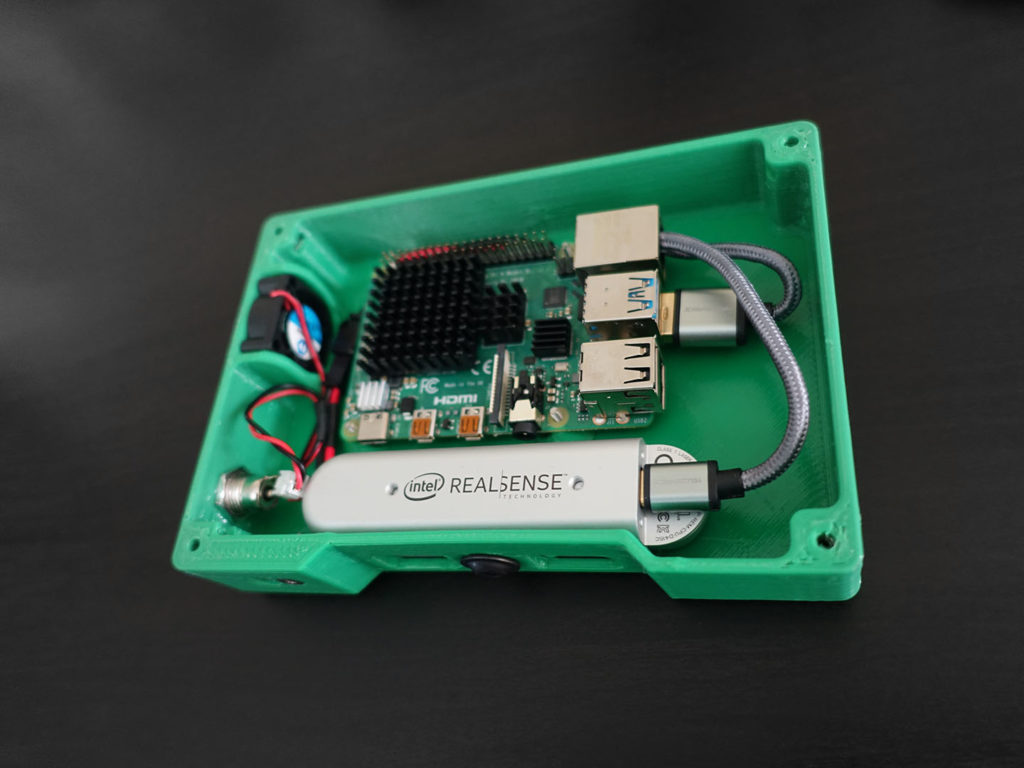
Handheld 3D Scanner: Based on Raspberry Pi
I’ve had some fun with photogrammetry recently and wanted to try out other techniques for 3D scanning. I’ve actually sort of accomplished S.L.A.M. during a hackathon using the PlayStation 4 camera and the Xbox One Kinect already, but I wanted something portable! With the new Raspberry Pi 4 debuting this year, I can finally accomplish this… sort of… Inside this 3D printed case is a Raspberry Pi 4 and a Intel RealSense D415 camera. The D415 is a depth sensing camera, using active stereo IR cameras and an internal processor to generate depth map data. It also has an ordinary RGB camera as well. That’s a lot of data to push through, hence why the newest Raspberry Pi 4 this year is important, because it has USB 3.0 ports that can handle all that data. (the ARM processor inside also has a faster architecture than before) How does the depth sensing work? Have you read my post on photogrammetry yet? There are some overlaps between the techniques. There are two IR cameras spaced apart, and it can see two very similar but shifted images. The processor finds interesting points (i.e. feature extraction) in the two images that are similar and match them up, the coordinates of these points can be used to calculate the 3D coordinates of those points relative to the cameras (i.e. binocular disparity). Why infrared? When there are not a lot of interesting features for the processor to look at, the…
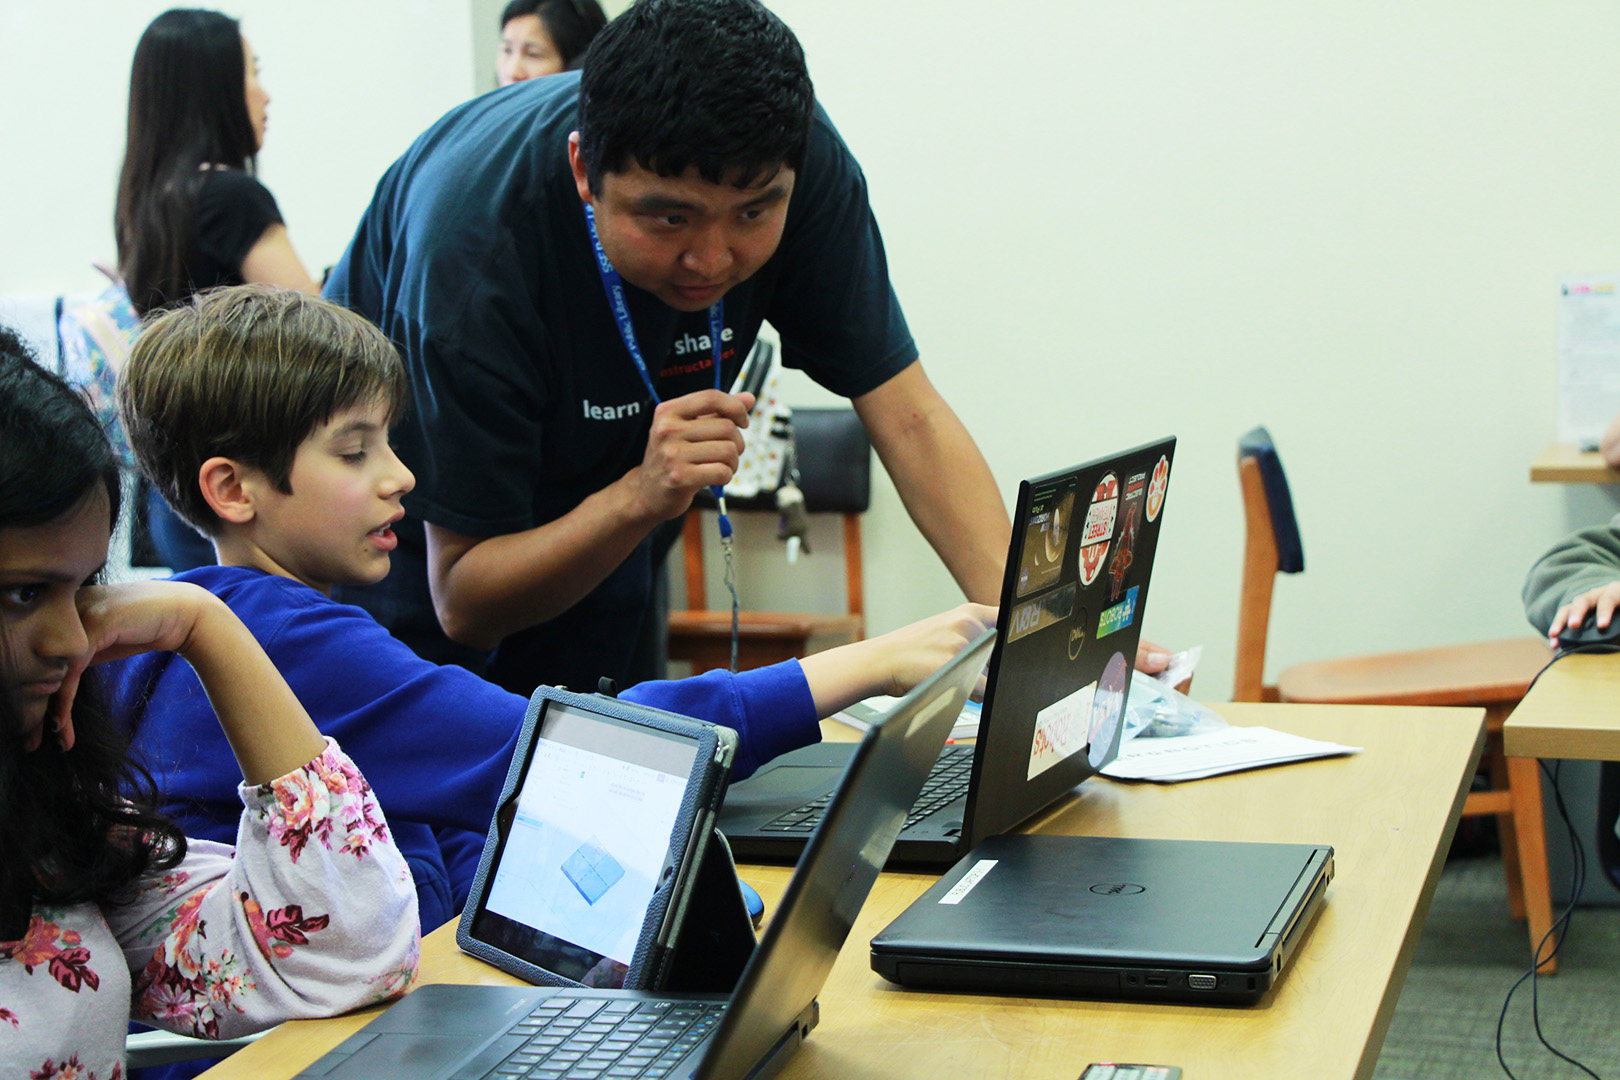
Guiding Students to Master Robotics Technology
I spend my Saturdays volunteering at a public library makerspace, the South San Francisco Public Library. I help people operate a few 3D printers, a CNC mill, vinyl cutter, etc. While preparing for my annual RoboGames entry, I thought it’d be cool to teach the library’s patrons about robotics. I designed a robot kit, partly 3D printed, with electronics that has to be soldered, and running with an Arduino Nano. The three classes are for 3D CAD modelling, soldering, and programming. The robots are designed to be cheap enough for the library to actually give away. All of my courseware is open source, hosted on GitHub. A lot of the tools and parts were donated by people I know in my professional circles. Here’s a link to the class content: click here This blog post is about what I observed, what I did right, what I did wrong. Day 1 – July 7 2018 Today is the 3D modelling class! For reference, all the class material used on this date is git hash 31871E2325BAFFEC8535DCAC8AB0131F2227401C. Use this to see what improvements were made to the class content after this date. Click Here to see this particular lesson’s page. Promotion, Registration, and Attendance The advertising is mainly from a video on the library’s events page. (this was done for me by library staff, the video is shown above if you want to see it) Class size has to be limited to 10.…
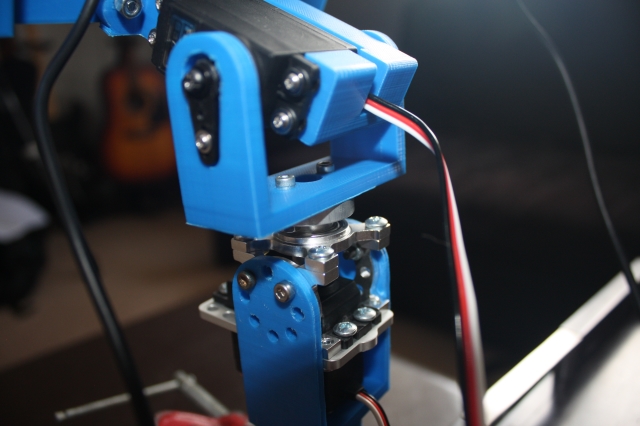
EaseRobot – A Cutting-Edge Autonomous Robot
Welcome to EaseRobot, a cutting-edge autonomous robot designed to revolutionize home automation. This innovative DIY robotics project aims to create a sophisticated house-bot that can navigate and interact with its environment. In this series, we’ll delve into the project’s details, starting with the concept, hardware selection, and initial software development. Inspired by the possibilities of modern robotics, EaseRobot is built around a Raspberry Pi 3, Model B, leveraging its processing power and versatility. By harnessing the capabilities of the Robot Operating System (ROS) and Raspberry Pi, we can focus on developing the robot’s features rather than building a custom processor board from scratch. EaseRobot is designed to perform various tasks, including facial recognition, speech synthesis, and autonomous locomotion. Our robot will be equipped with a 7″ touchscreen display and a camera module, enabling it to interact with users and navigate its surroundings. With ROS, we can develop and test nodes for the system, simulate the robot’s behavior, and refine our code. In this project, we’ll explore various “missions” that EaseRobot can perform, starting with the ability to take messages to specific individuals. We’ll break down this mission into smaller design goals, including face recognition, speech synthesis, locomotion control, and navigation. Join us on this exciting journey as we bring EaseRobot to life and explore the possibilities of autonomous robotics. Getting Started EaseRobot Tutorial 1 EaseRobot – A Cutting-Edge Autonomous Robot First installment in a series on…
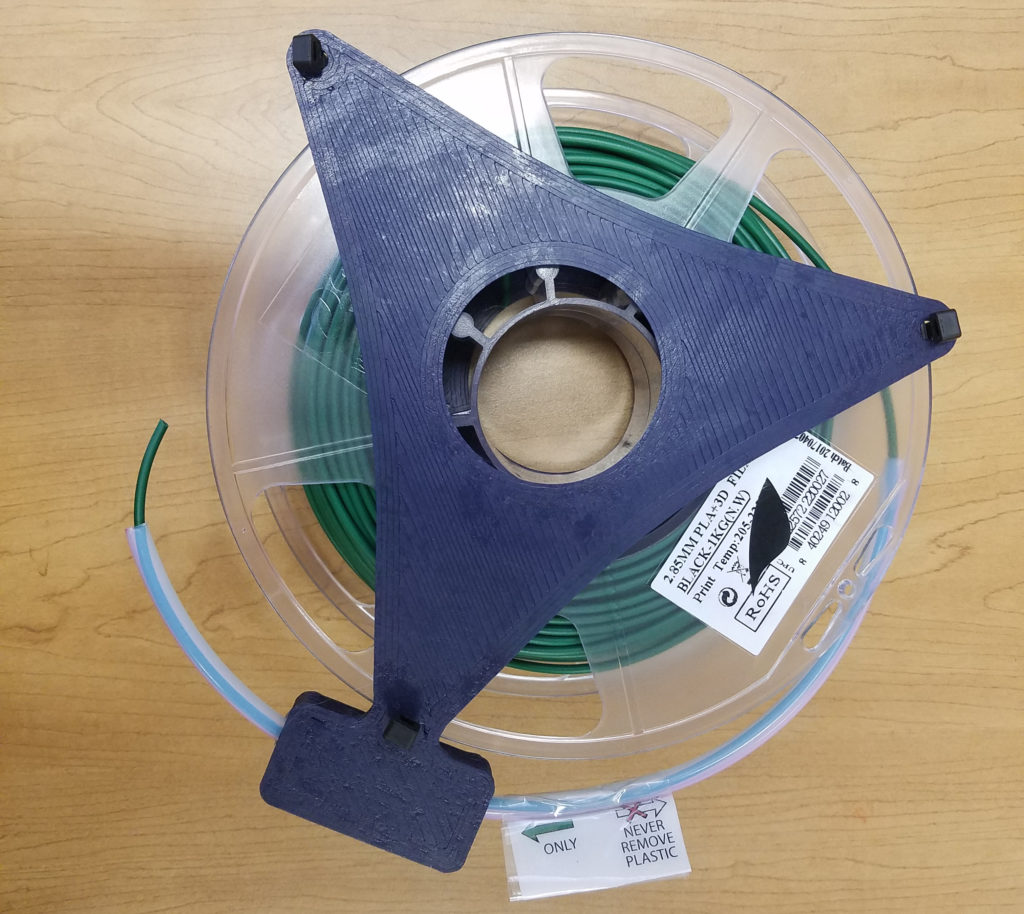
Upgrading Public Library 3D Printers to Ink-Based Printing Systems
Ha, that title makes me sound so evil. See… this library actually leaves their 3D printers unsupervised, and the patrons use them how they please. I love it, getting people exposed to the latest tech is our goal. But this means that people do not realize how to properly remove filament from the printers, leading to tangles and knots in the filament spools. A single mistake could essentially render a $20 spool useless, it becomes a time bomb for printer jams, making people unhappy. No amount of posters or instructions booklets could embed the same kind of discipline that a 3D printer owner has regarding filament treatment. Just a simple mistake of letting the filament go could cause a knot in the spool. My solution… make them use cartridges that make it hard to make mistakes. These cartridges must be cheap, fast to make, easy to understand, reusable, and do not require modifying the printer to use. Don’t worry, there’s no DRM bull**** and they are adjustable to fit any standard spools. If my idea causes more problems than it solves, simply clip all the zip ties and go back to status-quo. It’s just two plates, sandwiching a spool, with 3 zip ties to make sure the spool doesn’t fall out but still allow the spool to spin. The magic is the teflon tube that’s attached to one of the plates … … which serves the…