I made(*) this tiny remote control for Sony Alpha cameras.
Preface
This is an open source firmware project. I wrote the source code for this project in Arduino flavored C++ and I am sharing it on GitHub. (*)I did not design the hardware nor do I offer it for sale.
GitHub project main page
Instructions for building and usage
Features

- Remote Shutter (with optional timer)
- Remote Movie Record
- Focus Stack
- takes consecutive photos as the focus is slowly shifted, this is a technique used in macro photography and some other camera brands offer this in-camera (but not Sony)
- Focus 9-Point
- takes consecutive photos as the auto-focus point moves around the scene, to obtain multiple photos focused on multiple objects, convenient for landscape photography
- Focus Pull
- optionally, attach a focus knob for linear focusing on focus-by-wire lenses
- Talley Light
- Sound/Voltage/Motion Triggered Shutter
- with adjustable level threshold and adjustable delays
- with optional automatic re-arming, and adjustable video record lengths, for security/wildlife camera purposes
- Dual Shutter
- takes two consecutive photos, with different shutter speeds, for compositing photos with both sharp subjects and blurred features
- Intervalometer
- supports AF-C, different from in-camera intervalometer (which forces AF-S)
- Astrophotography Intervalometer
- same as intervalometer but more focused on bulb mode, and uses pause time instead of fixed interval time
- Focus Frustration
- is your camera not focusing on the thing you want it to focus on? rapidly tapping the AF button repeatedly will automatically pull the focus back to the nearest possible point
- Timecode Reset
- Uses infrared command to reset the timecode on any cameras within the vicinity. (see feature request)
Minor Features
- can fall-back to using infrared communication if Wi-Fi is disconnected
- can use shutter release cable connected to GPIO
- status bar with battery indicator and connection indicator
- auto power save
- configurable options
- serial port debugging and command line interface
- smartphone web-browser interface to manage multiple camera logins
The Story and the Challenge
A while ago I owned a camera that was before bird tracking auto-focus was a well implemented feature, but got super envious when the Sony A1 was released. I ended up adding bird tracking to the camera myself, using a Google Coral to accelerate a simple pretrained neural network to point out birds and move the focusing point around on the camera. That project involved some reverse engineering of the Picture Transfer Protocol (aka. PTP) that is used by Sony between their camera and their PC app.
Then I got interested in macro photography. There’s a technique in macro photography called Focus Stacking that I wanted to use but it’s a bit of a pain, some other camera brands offer this features in-camera, but not Sony. Knowing that it can be implemented with some commands over PTP, I wanted to add this feature to the camera as an external accessory. But this time it had to be a tiny battery powered wireless device.
Here’s a demo video of Alpha Fairy doing focus stacking:
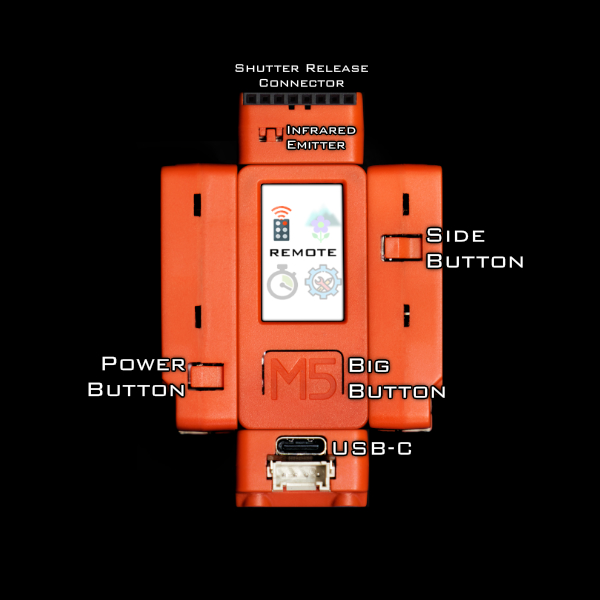
Naturally I gravitated towards using the ESP32 family of microcontrollers as a starting point, as it offered Wi-Fi. As I searched for a suitable development kit, I stumbled upon M5StickC

a $20 device that packs a ESP32-PICO, colour LCD screen, 2 buttons, a IMU sensor, infrared emitter, microphone, and has a battery with charge management, even coulomb counting. This thing is perfect!

IMPORTANT this project started with M5StickC, but currently all development targets M5StickC-Plus, it is currently not possible to buy the original M5StickC anyways.
With the available horsepower of the ESP32, I came up with a whole bunch of other features I would like to see in a camera remote.
Now the challenge became “how do I implement everything on a device with only 2 buttons and not have it piss me off?” Answer: Use the IMU sensor for a ton of motion based controls.
I wanted the user interactions to be intuitive but also minimize required button presses for tasks. I kept the big button as the “activate button” and the side button as the “next button”, I eventually figured out that I can poll the power button, and it became the “cancel/exit button”. I kept this theme consistent.

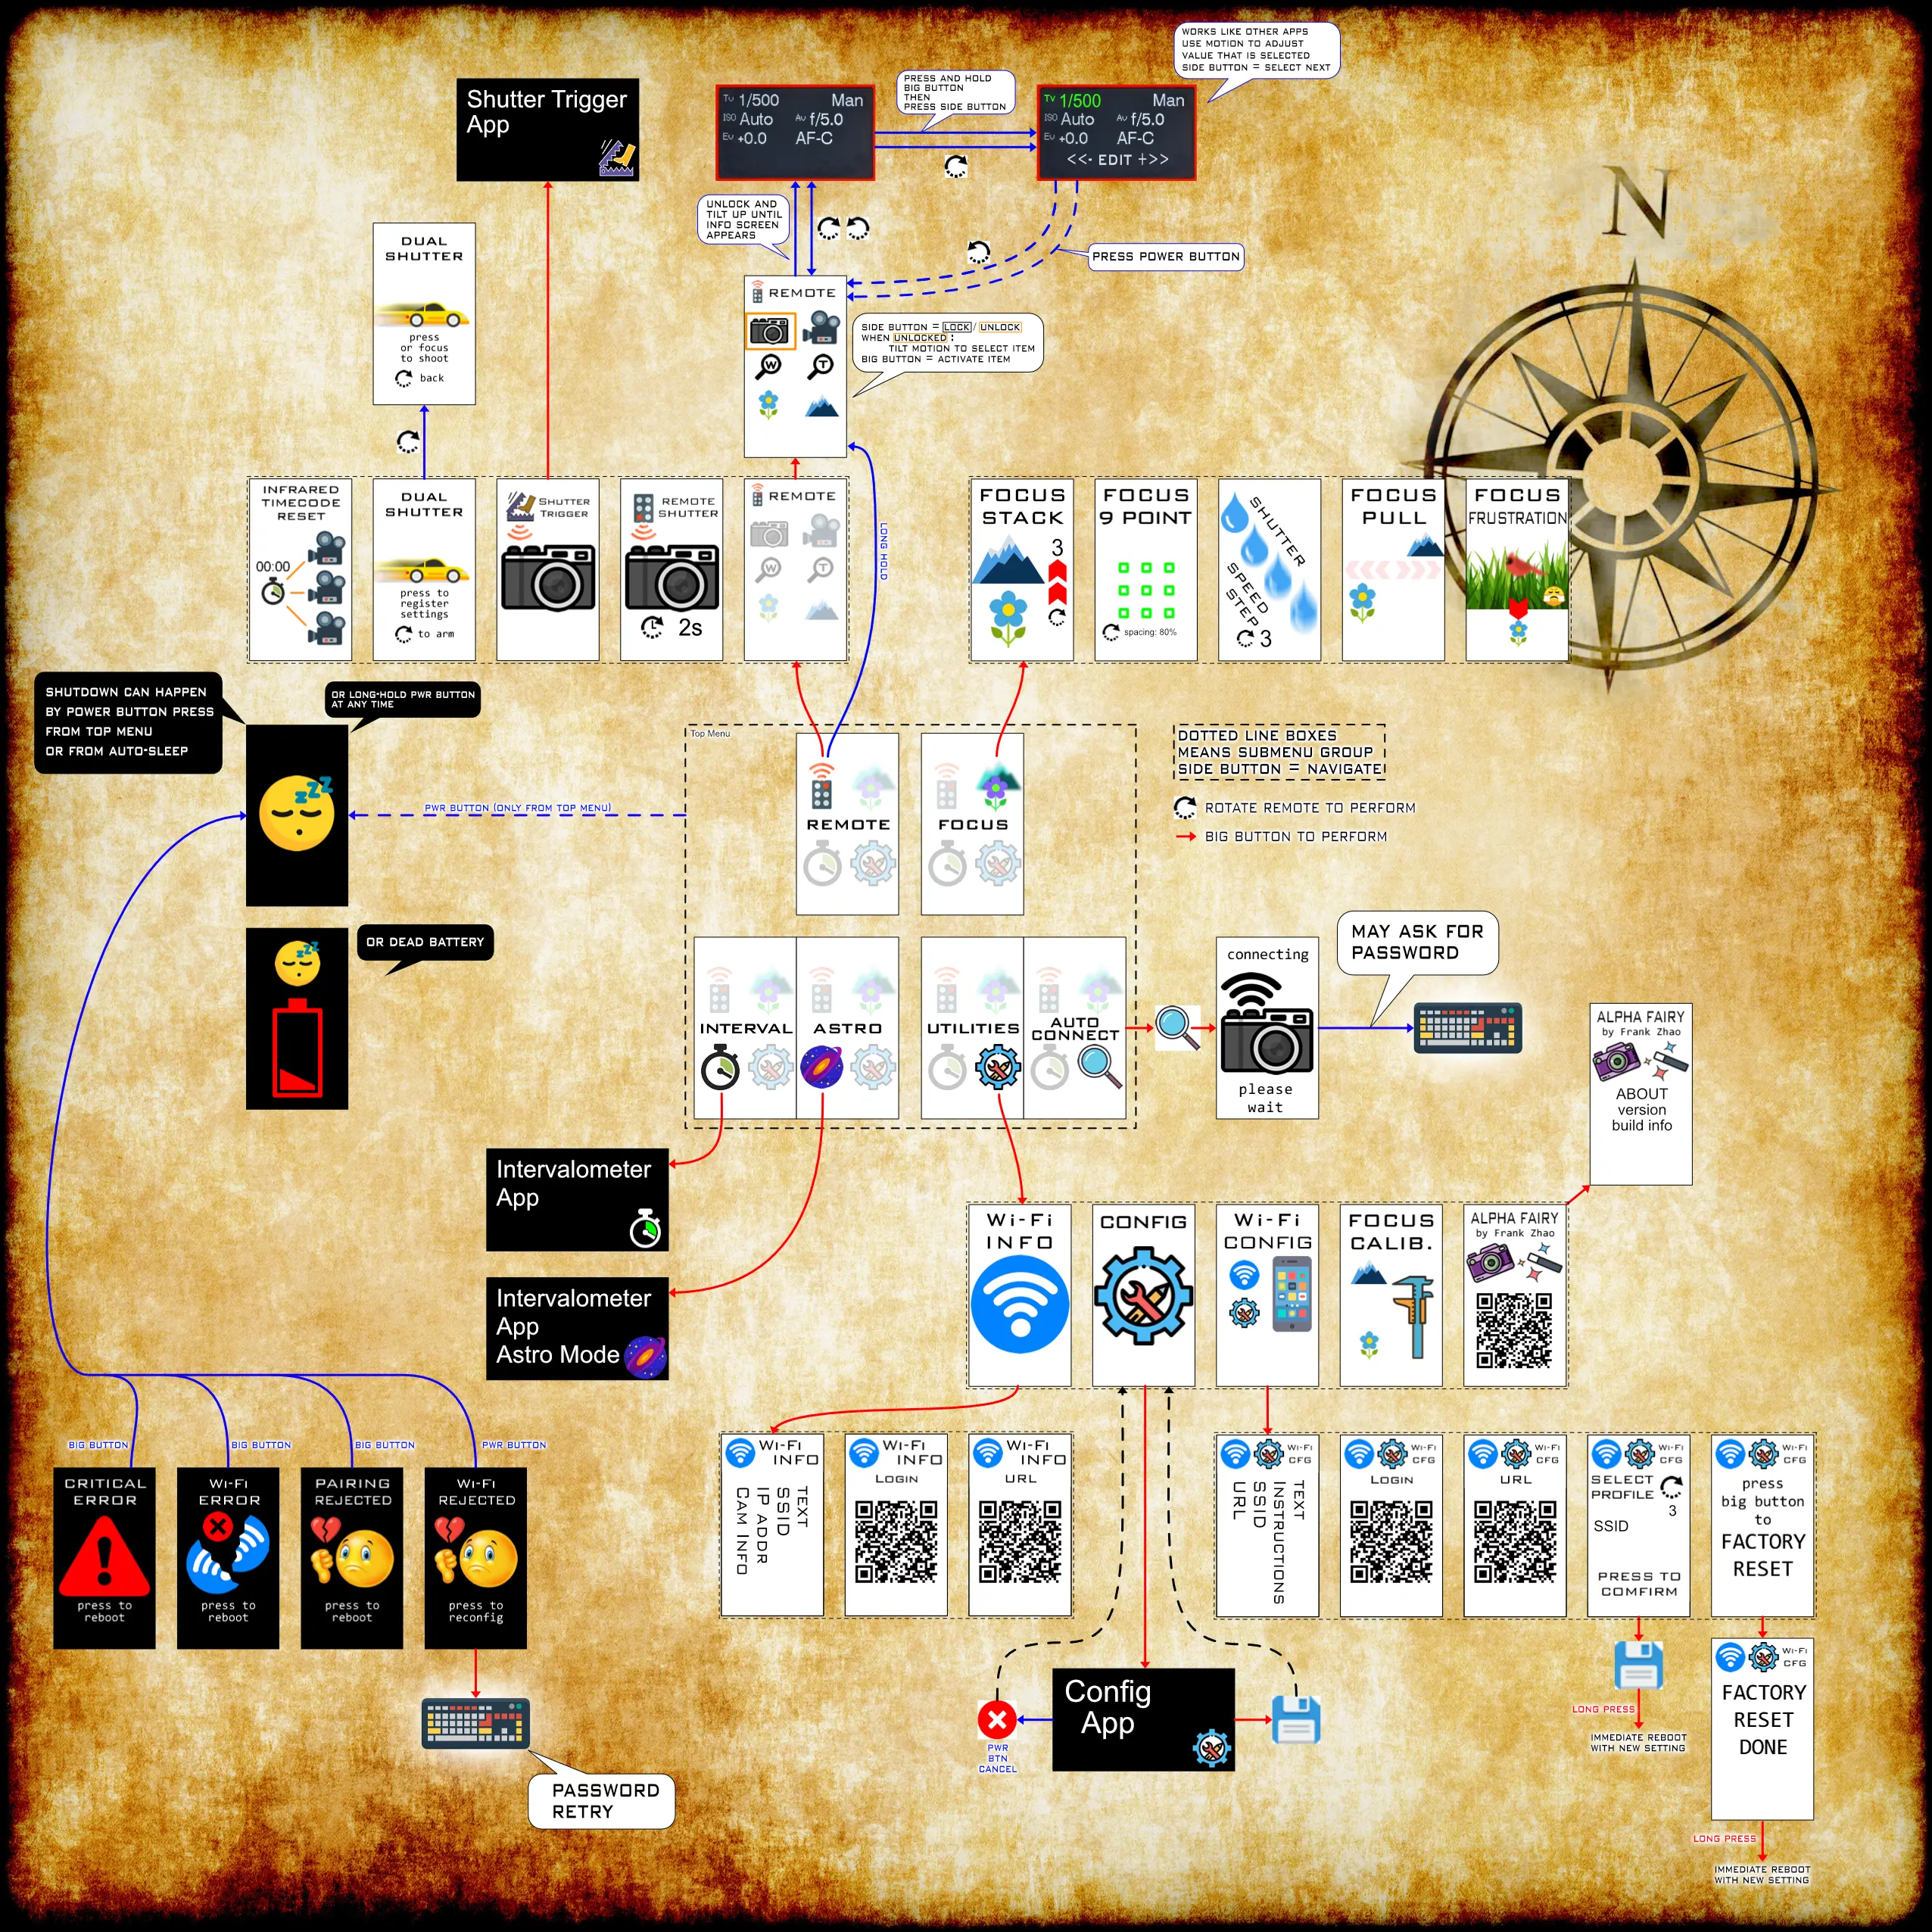
The large number of features forced me to implement a two layered menu system instead of one linear menu, categorization means shorter lists to scroll through.
To be a practical tool, the most commonly needed functions needed to be quick to access, so the first screen combines shutter, video, zoom, and focus…

…all on one screen where you select items with motion. The selection can be locked down with the side button so it’s not annoying. These are the functions that somebody needs when setting up a shot, hence why they are prioritized.
There are features that require the user to edit a number, such as the interval time value for the intervalometer. Without a IMU, I have two choices, either have the user loop through some pre-defined values, or have the user first pick between adding to or subtracting from the value first, and then letting them actually modify the value. But with the help of the IMU sensor, now the user can pick between going up or down by tilting the remote left or right and then pressing the big button to actually make the change. Holding the button will change the value with an accelerating repetition.


For the remote shutter’s time delay, which only offers 3 options (2 seconds, 5 seconds, or 10 seconds), instead of using a series of button presses, the user can simply spin the remote around.

For focus pulling and zooming, since there are three focus step sizes in each direction, the user can tilt the remote to choose the step size and direction.

To input a Wi-Fi password, I needed to implement a tiny keyboard. To keep the keyboard small, I surveyed some other Sony camera owners, and figured out that the password can contain uppercase and lowercase letters and sometimes numbers too. With the available screen size, available fonts, and knowing how accurate the IMU’s AHRS algorithm is, I implemented a gyroscopic keyboard on this tiny remote. (other ideas were considered, such as T9 input method)

And another thought was that the camera itself has a bunch of buttons and dials, what can the remote do with those (knowing the PTP protocol includes a status packet)? The “Dual Shutter” feature I implemented will grab the settings of the second shutter out of the camera. The “Focus Frustration” feature I monitor the focus status of the camera to detect if the user is rapidly tapping the autofocus button.

Wacky Features
I implemented some typical camera controlling features, and I’ve explained Focus Stacking already. What about the other weird stuff?
“Dual Shutter” is meant to make composite images of fast moving objects by taking two consecutive photos rapidly, freezing the object with a sharp image (fast shutter speed) but also giving it a motion blurred trail (slow shutter speed). The remote remembers the settings for the second photo from the camera (fast shutter speed), then the user changes the settings on the camera to a slow shutter speed (the remote does not care about this), then the user autofocuses on the subject, the remote detects this, takes one photograph, then immediate changes the settings for fast shutter speed, and takes a second photograph.

In practice, this feature doesn’t work that well. Sometimes the camera ignores the new setting (even if the command is technically acknowledged). By the time I am able to get the camera to respond, the time gap between the two consecutive photos is too long.
The “Shutter Speed Step” feature simply takes photos repeatedly while slowing down the shutter speed between each photo. This is meant as a preview tool, the photographer sets up the camera in front of a waterfall but don’t know what shutter speed they actually want, so they just hold down the button and let the remote do the work for a few seconds, and check the preview.
In practice, this doesn’t work so well because of that problem I mentioned with the camera ignoring new shutter speed settings. Plus, at extreme long exposure settings, a ND filter need to be used, and I have not seen any affordable motorized/automated VND filters.
“Sound Shutter” exists because my smartphone can do it. It can’t recognize words…

it’s just a peak detector using the microphone. It’s got a time delay configuration too. The buttons are placed sort of close to the microphone on the circuit board so clicking the buttons will make the level peak frequently, I have a simple delay algorithm to avoid it accidentally taking a photo from just the button click sounds.
I also added the ADC (voltage input) pin and the IMU sensor as triggering sources. Here’s a demo of the IMU being used as a trigger source:
Here’s a PIR motion sensor wired to the Alpha Fairy:

The triggering action can also be changed from photo to video, or even start the intervalometer. If video mode is configured, the video length can be specified. When a trigger even happens, the system can be configured to re-arm itself after a delay too. This makes it usable for security or wildlife camera purposes, the number of events will be tracked. The voltage input mode allows the user to connect things like a PIR motion sensor, or laser beam-break, or some other sort of boobytrap.
“Focus Frustration” is a joke feature. When a photographer gets frustrated that their camera’s AF has locked onto something in the background and gets stuck, they will repeatedly tap the AF button hoping that it will lock onto something else. Soooooo I detect this rapid tapping, then the remote sends the command to go into MF mode, and pull the focus all the way to the front.
“Focus 9-point” will continuously take photos, and change the focus spot to one of 9 points between each photo. This is pretty gimmicky, the idea is for landscape photographers to focus stack by having a photo focused on one tree in the front left, another one focused on a mountain in the back, another one focused on the house to the right, yada yada yada. (after 9 points in a grid, it starts to do random points)
I implemented this simply to show and test the API that shifts the AF spot. It’s kinda useless in real life. But if you needed AI driven bagel tracking autofocus, this is the API you want.
A bit more practical
The intervalometer has a specific Astrophotography Mode. In this mode, instead of specifying a fixed interval (ie. take photo every x seconds), the user can specify a short pause after each photo. This is useful in astrophotography specifically because it allows the user to edit the bulb time without worrying about the interval time, and the pause time can be used for a technique called dithering. Also, I implemented a cancel mode that will finish the current photo before cancelling, useful for exposures that are several minutes long (other intervalometers don’t have this feature, its to save time and not waste a photo).


Some other brands of camera feature a top data display, so I implemented this feature, more so as a demo of camera property packet parsing.

Some people making videos might appreciate a larger talley light. I added a feature that turns the entire screen bright red whenever video recording starts.

The red screen can be cleared with a button if you need to, and the entire feature can also be disabled through the config menu. Oh, did I mention the M5StickC actually has magnets inside and some screw mounting points?
A focus knob can be added to the remote, it will linearly pull focus with focus-by-wire lenses. It’s a rotary encoder sold by M5Stack, I used some 3D printed pieces to make it more ergonomic and easier to attach to rigs.

This feature is always active, with adjustable parameters. Unfortunately, it will take some calibration for it to work linearly, because I cannot determine the ratio between the “medium” focus step size and the “large” step size for every lens. Mapping a single medium focus step to one click of the knob is actually quite slow, using a large step can speed up the focus shift but the firmware need to know the ratio between medium and large to do this linearly. I did add a menu utility that can automatically perform this calibration!

I talk about all of these features in the full features guide of Alpha Fairy.
Firmware
The code I wrote is pretty complex and messy as it is a just-for-fun project, but I did put effort into the underlying library that communicates with the camera. I hope somebody finds it useful. Maybe somebody has an amputee friend who wants foot pedals to set the shutter speed on their camera, that somebody can benefit from this code.
Sony now has two camera remote SDKs. The newer one uses PTP, the PTP stuff is hidden from the developer, and this SDK is only available for Windows, Mac, and Linux (including ARM). The trouble here is that it’s a binary blob and can’t be used on a microcontroller. I had to put in some effort into analyzing the traffic between the official Sony remote app with Wireshark and Beagle USB analyzer. The older Sony camera remote SDK is simply a set of commands sent over HTTP, encapsulated in JSON, super easy to implement but a bit inefficient in terms of memory and speed. I implemented both the newer and older protocols in this remote, so the coverage of supported cameras is pretty wide.
I talk a ton more about my firmware engineering efforts and camera reverse engineering on GitHub. Read deeper about how I handled threading, memory management, power management, etc.
I originally wrote the firmware in MicroPython, hoping that maybe some photographers can quickly learn Python and add features they like. But that didn’t work mainly due to memory constraints. The C++ code already takes 88% of program memory, the MicroPython code I wrote failed on the first import due to OutOfMemoryException (and that was just the PTP test code). Also, MicroPython is usually great, but M5’s implementation of it sucks, literally cannot use the UART for debugging or REPL, I rant about it here.
FAQ / Q&A
Do you sell this? No, you have to buy the M5StickC-Plus on your own and follow the instructions on how to install the firmware I wrote onto it. I have no affiliation with M5 at all.
What cameras are supported? PTP supported (newer) cameras: listed on Sony’s page here (weird, I noticed they removed support for ZV-E10, I’ve tested it on my friend’s ZV-E10 though). HTTP+JSON supported (older) cameras: listed on Sony’s page here. Personally, more testing has been done on Sony A1, A6600, and RX100M4, as I own these.
Can it support for other brands? If somebody buys me a Canon EOS R7 and the RF 100-500mm f/4.5-7.1 lens in exchange for writing that code, I would do it. The PTP class I wrote is inherited by another class representing Sony cameras. I’d need to write a Canon class and then do some more reverse engineering.
What’s next? What’s the roadmap? Code cleanup, I should make the menu system more object oriented, so people can contribute apps easier. Power management, I need to figure out if the ESP32 can do light-sleep while maintaining Wi-Fi connections (documentation says it can, but it hasn’t worked for me).


