
You’ve got a shiny new Single Board Computer, like a Raspberry Pi, for a headless project, but then you’re hit with the realization – no monitor in sight for the initial setup. Fear not, though, if you’ve got a laptop nearby, there’s a potential workaround waiting for you (and me).
What are SBCs?
On a single, compact circuit board, Single Board Computers (SBCs) pack a punch, integrating all the vital components of a computer. This includes a processor, memory, storage (via microSD cards or eMMC), and a range of input/output interfaces (such as USB ports, LAN, HDMI, and GPIO pins), along with power management circuitry. Their small size, affordability, and versatility make SBCs a go-to solution for a wide range of applications.
There are some key points of why you would like to use an SBC:
- SBCs are generally more cost-effective compared to traditional desktop or laptop computers. This affordability makes them attractive for hobbyists, students, and small-scale projects.
- Due to their small form factor, SBCs are portable and occupy minimal space. This makes them suitable for embedded systems, DIY projects, and applications where space is limited.
- SBCs can be used for a wide range of purposes, including:
- Education: SBCs are popular in educational settings for teaching computer programming, electronics, and robotics.
- Home Automation: They can be used to build home automation systems and IoT (Internet of Things) devices.
- Media Centers: Some SBCs are capable of running media center software, allowing users to stream and play multimedia content on their TVs.
- Server and Networking: SBCs can serve as lightweight servers or network appliances for tasks like file sharing, web hosting, or routing.
- Robotics: SBCs are used to control and program robots for various applications.
- Gaming: Some SBCs can handle retro gaming emulation, making them a favorite among gaming enthusiasts.
- Many SBCs are based on open-source hardware and software, allowing users to modify and customize them to suit their needs. This open nature encourages a big community of developers and enthusiasts.
- SBCs can run various operating systems, including Linux distributions (such as Raspbian for Raspberry Pi), Android, and more. This flexibility enables users to choose the OS that best fits their requirements.
- SBCs often feature GPIO (General-Purpose Input/Output) pins that allow for hardware expansion and interfacing with other devices and sensors. This makes them suitable for electronics and robotics projects.
Some well-known examples of single-board computers include the Raspberry Pi series, Arduino boards, BeagleBone, and Odroid, among others. Each of these SBCs may have its own unique specifications and capabilities, catering to different user needs and project requirements.
What kind of connection most SBCs have?
Single-board computers (SBCs) typically feature different kind of connection options to facilitate their use in various applications. These connections can vary depending on the specific SBC model, but here are some of the most common types of connections found on many SBCs:
- USB Ports: SBCs often include one or more USB (Universal Serial Bus) ports. These ports are versatile and can be used for connecting peripherals like keyboards, mice, external hard drives, Wi-Fi dongles, and more.
- HDMI or Display Port: Most SBCs designed for multimedia and display applications come equipped with HDMI or DisplayPort connectors. These allow you to connect the SBC to a monitor or TV for video and audio output. Old generation SBCs also had analog video jacks – not the case anymore with the newest boards.
- Audio Jacks: SBCs may have audio output jacks (3.5mm or HDMI audio) for connecting speakers or headphones. Some models also include a microphone input (usually combined into single 3.5 mm audio jack).
- Ethernet Port: Many SBCs have an Ethernet port for wired network connectivity. This is useful for networked applications and internet access.
- Wi-Fi and Bluetooth: Some SBCs include built-in Wi-Fi and Bluetooth capabilities, while others may require USB dongles or additional hardware for wireless connectivity.
- GPIO (General-Purpose Input/Output) Pins: GPIO pins are used for digital input and output, allowing you to connect and interface with various sensors, actuators, and external devices. These pins are commonly used in electronics and robotics projects.
- Camera Interfaces: Some SBCs have dedicated camera interfaces (e.g., CSI – Camera Serial Interface) for connecting compatible camera modules.
- Storage Interfaces: SBCs typically support microSD card slots for storage, but some models may include SATA or M.2 connectors for connecting solid-state drives (SSDs).
- Power Input: SBCs require a power source, which is usually provided through a micro USB or USB-C port, a barrel jack, or header pins. The power requirements can vary between SBC models.
- Additional Expansion Headers: Depending on the SBC, you may find additional expansion headers like I2C, SPI, UART, or PWM for interfacing with various sensors and peripherals.
It’s important to note that the availability and types of connections can vary widely between different SBC models. When choosing an SBC for a specific project, consider the connectivity options you’ll need to ensure compatibility with your intended use case. Additionally, some SBCs may have add-on boards (HATs for Raspberry Pi, for example) that can expand their connectivity options even further.
Usual setup (monitor, keyboard, mouse)
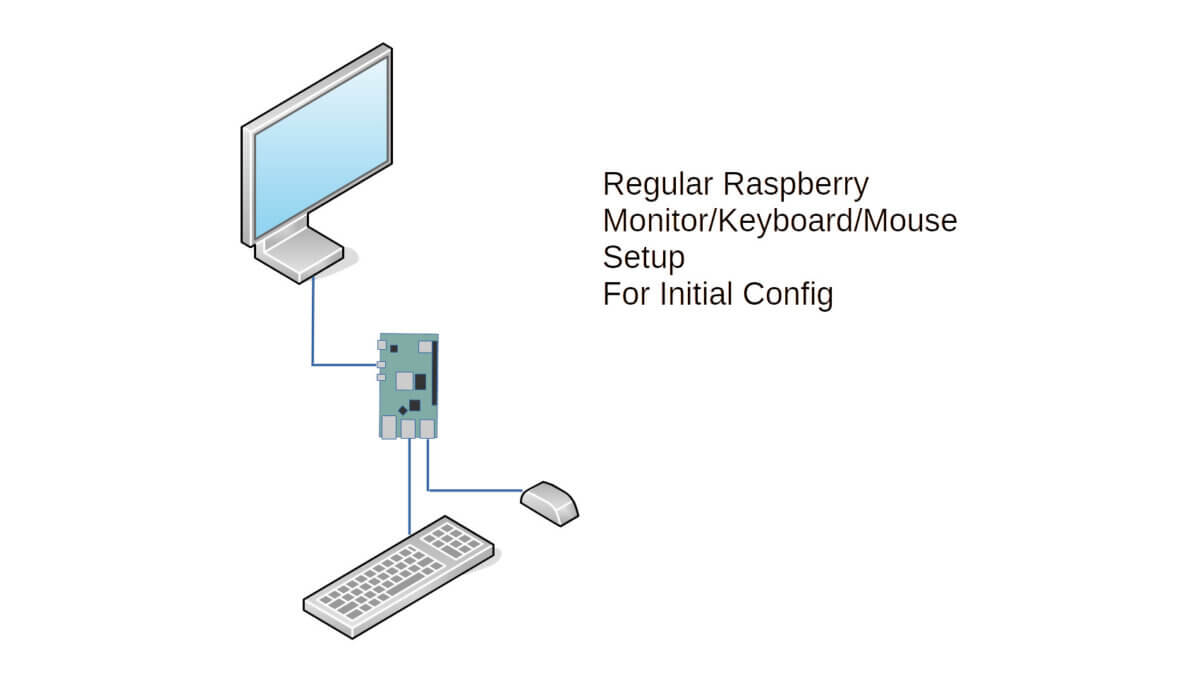
A regular Single Board Computer (SBC) setup involves connecting the SBC to a monitor, a keyboard, and a mouse, creating a functional computing environment. This setup is commonly used for tasks such as web browsing, programming, media playback, and more.
Such setup is also commonly used for setting up SBC for a so called headless operation. Here is an example of a regular RPI to monitor connection scheme:
What’s a headless machine?
A “headless Single Board Computer (SBC)” is a type of single-board computer that functions without a graphical user interface (GUI), monitor, keyboard, or mouse. In simpler terms, it’s an SBC that operates without a traditional screen and input devices, and instead, it is typically controlled remotely using command-line tools or network connections.
Such machine works as a server which is connected only to a LAN and maybe has other connections, but it has no monitor, keyboard and mouse. For an SBC such use case is quite popular: print server, mini WEB server, headless media server/player, home-assistant machine, NAS, etc.
The problem with a headless computer
The problem here comes when you want to make first steps – install OS and set up additional software on a headless SBC. Sometimes, you can get away with just flashing your SD card with an OS image and it by default has some kind of remote connection already set up (like SSH). In other cases, to make your machine accessible remotely you will need to attach monitor/keyboard/mouse to make such setup.
Also, there might be times when something goes wrong and you lose remote connection possibility – then again you will have to connect a monitor to your headless computer.
Especially monitors are bulky and additionally require a power supply outlet which sometimes might be hard to find a free socket nearby your SBC.
So, up till now, my idea should be clear – it would be nice to have some kind of a monitor replacement which could be used in those although rare, but still occurring situations.
Alternative method – laptop as a monitor
If you are working with a Raspberry Pi or its alternative like Bananapi, Orangepi etc., you probably have a tool – a PC with which you make an initial setup: write an SD card. There is a high chance, that this PC is actually a laptop which makes everything even easier.
So, you can use your laptop which already has a screen instead of a dedicated monitor connected to the Raspberry Pi.
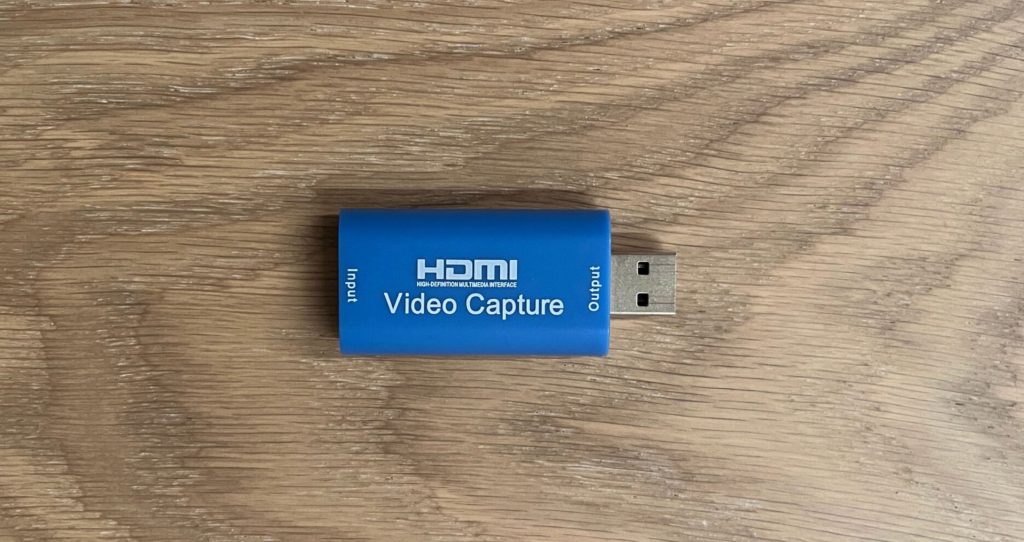
For this purpose, you will need an USB capture card, which looks like this:
And an HDMI cable. Parts list is below:
- micro HDMI cable (Aliexpress affiliate link) (used for Raspberries and similar SBCs – check compatibility!)
- Capture card (Aliexpress affiliate link)
Or, if your SBC or a PC has a regular HDMI connection:
- HDMI-HDMI cable (Aliexpress affiliate link)
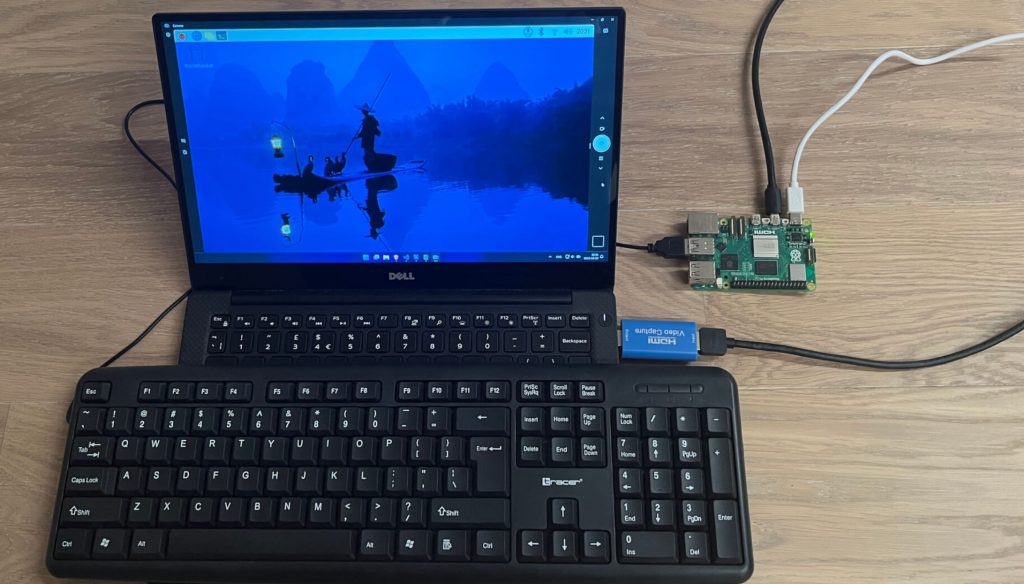
It is a tiny device with USB connection on one end, and an HDMI on another end.
Whole connection goes as follows: take an HDMI cable and connect it to the SBC, HDMI’s other end connect into USB capture adapter card and the card itself into PCs USB port:
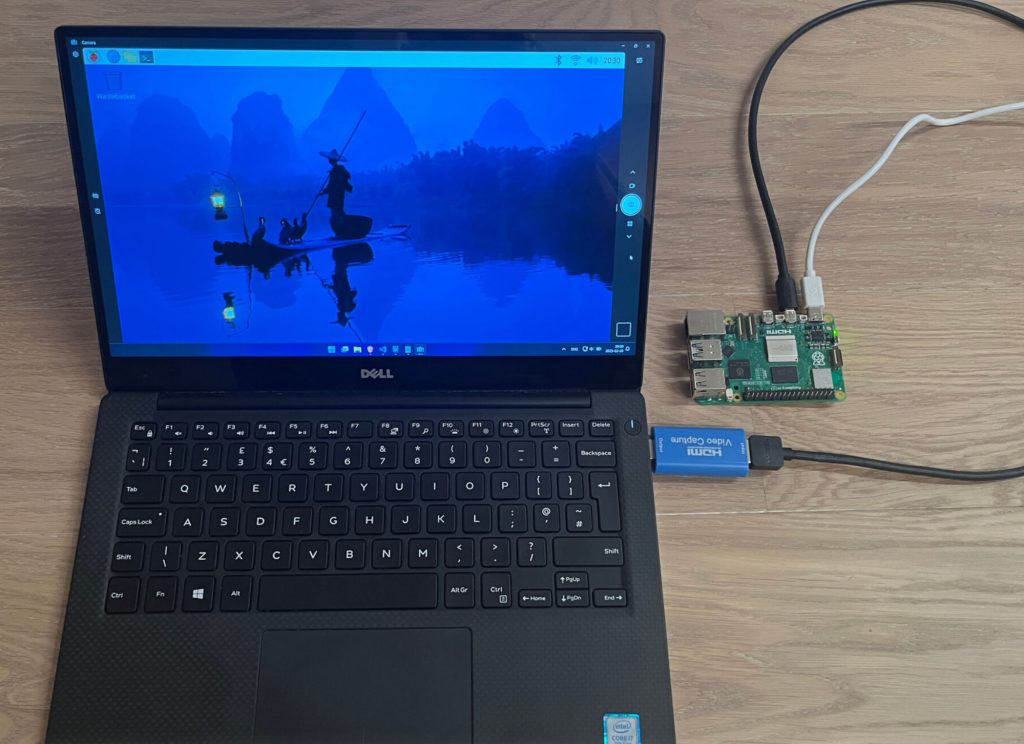
Also, connect a keyboard and, if needed, a mouse to your SBC.
OK. So, now you have almost working setup. The last thing to make the setup fully working you will need some kind of software which could show video coming from the Raspberry Pi into the capture card.
If you are running Windows 10 or 11, you should already have an app called “Camera”. This app shows your webcam stream. As the capture card works as an USB webcam, the software fully works with the card.
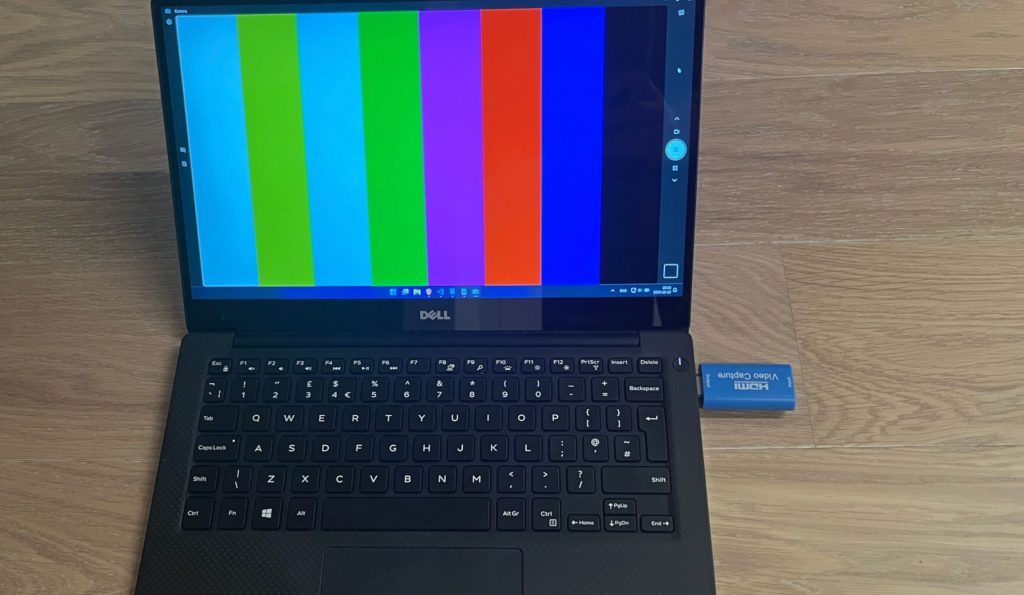
Open “Camera” app and you should be able to see something like in the image below:
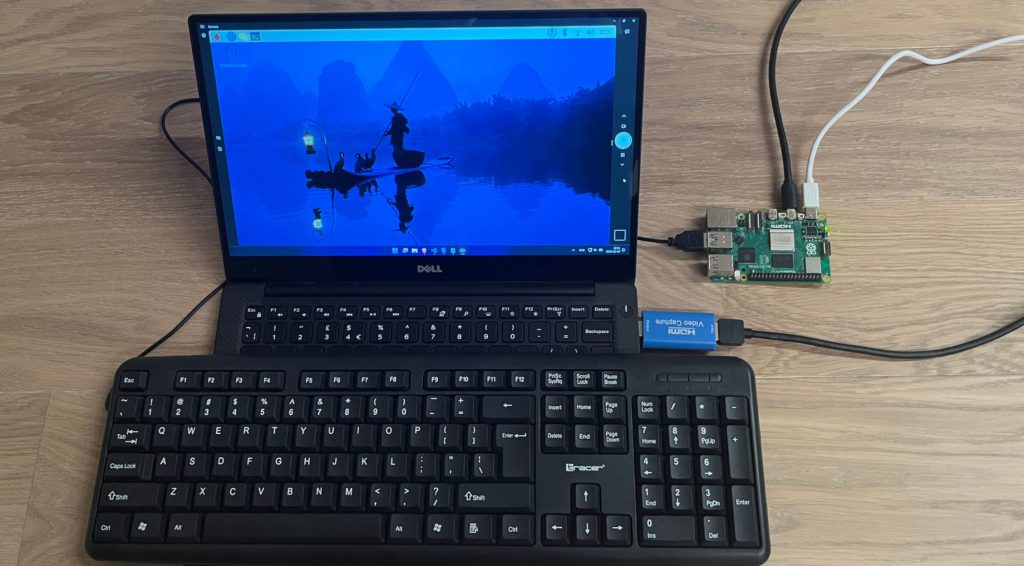
You will get such image when there is no video coming through the HDMI port.
Now, flash the SD card, insert it into your RaspberryPi, bananaPi, OrangePi or other SBC, and you will get its screen shown in the “Camera” app.
Further ideas
So, what can be done to further improve headless Raspberry Pi first setup experience. My idea is to build an intermediate device which would then connect between Raspberry’s and Laptop’s USB ports. Such device would capture mouse and keyboard input from the laptop and send them into Raspberry Pi. In such case, you would need only a laptop to fully replace an external monitor, keyboard and mouse.
Summary
So, that was my method, how I personally use a laptop instead of a monitor, when I don’t have one laying around. Actually, this method is suitable for any HDMI capable device – SBC or a normal PC – it doesn’t matter.


