I spent a few weekends this summer going to a few local parks with suitable statues/sculptures. Some of the most successful scans I have been able to convert into a web-interactive model:
Lion, at the Wellesley Crescent Park in Redwood City
Quetzalcóatl, at the Plaza de César Chávez in San Jose
People think this one is a pile of something from afar…
Geese, at the Shorebird Park in Foster City
This park is kind of a favorite, not far from home for a good hike along the water. People also ride dirt bikes and fly racing drones here.
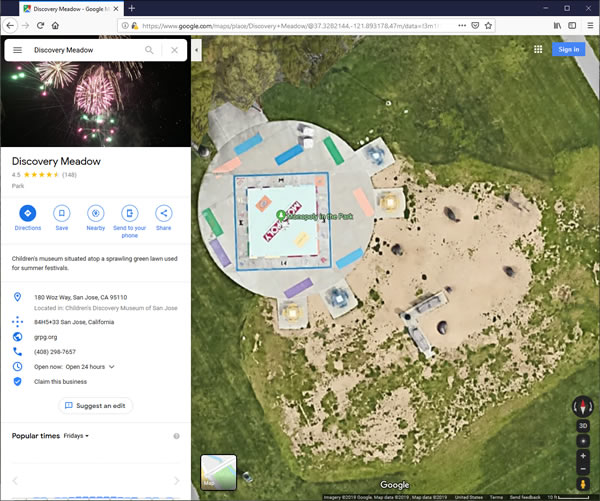
Bird, at the Discovery Meadow in San Jose
The way I concentrated where I took the photos made an insanely highly detailed mesh. But the top of the bird is still very high up, and I couldn’t get my camera above it.
and some ones I can’t host as interactive models:
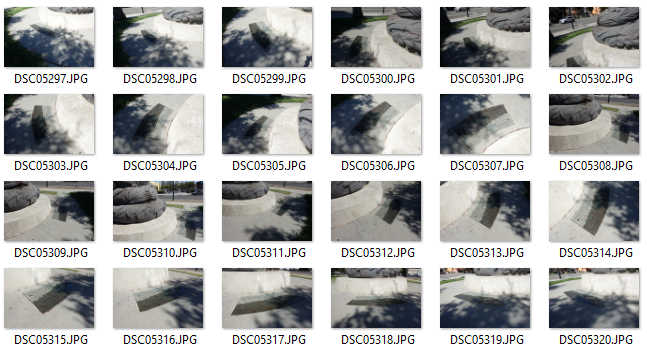
Bench, at Purisima Creek, Redwood City
I couldn’t capture photos behind the bench because I didn’t want to damage the surrounding vegetation. So this is not a solid model at all.
Frog, at the Discovery Meadow in San Jose
This one was beside the bird. I can’t make this model “water-tight” so I can’t render it with three.js yet.
Wellesley Crescent Park, Redwood City
This model includes the two lions and two stone benches
This was my first experiment with capturing an entire environment by walking farther away. The stone benches were also somewhat highly detailed.
Figure Holding the Sun by Italo Scanga
In front of the San Jose Museum of Art
This statue is extremely tall, so I can’t take photos from above it. This means the mesh is not high quality at the top.
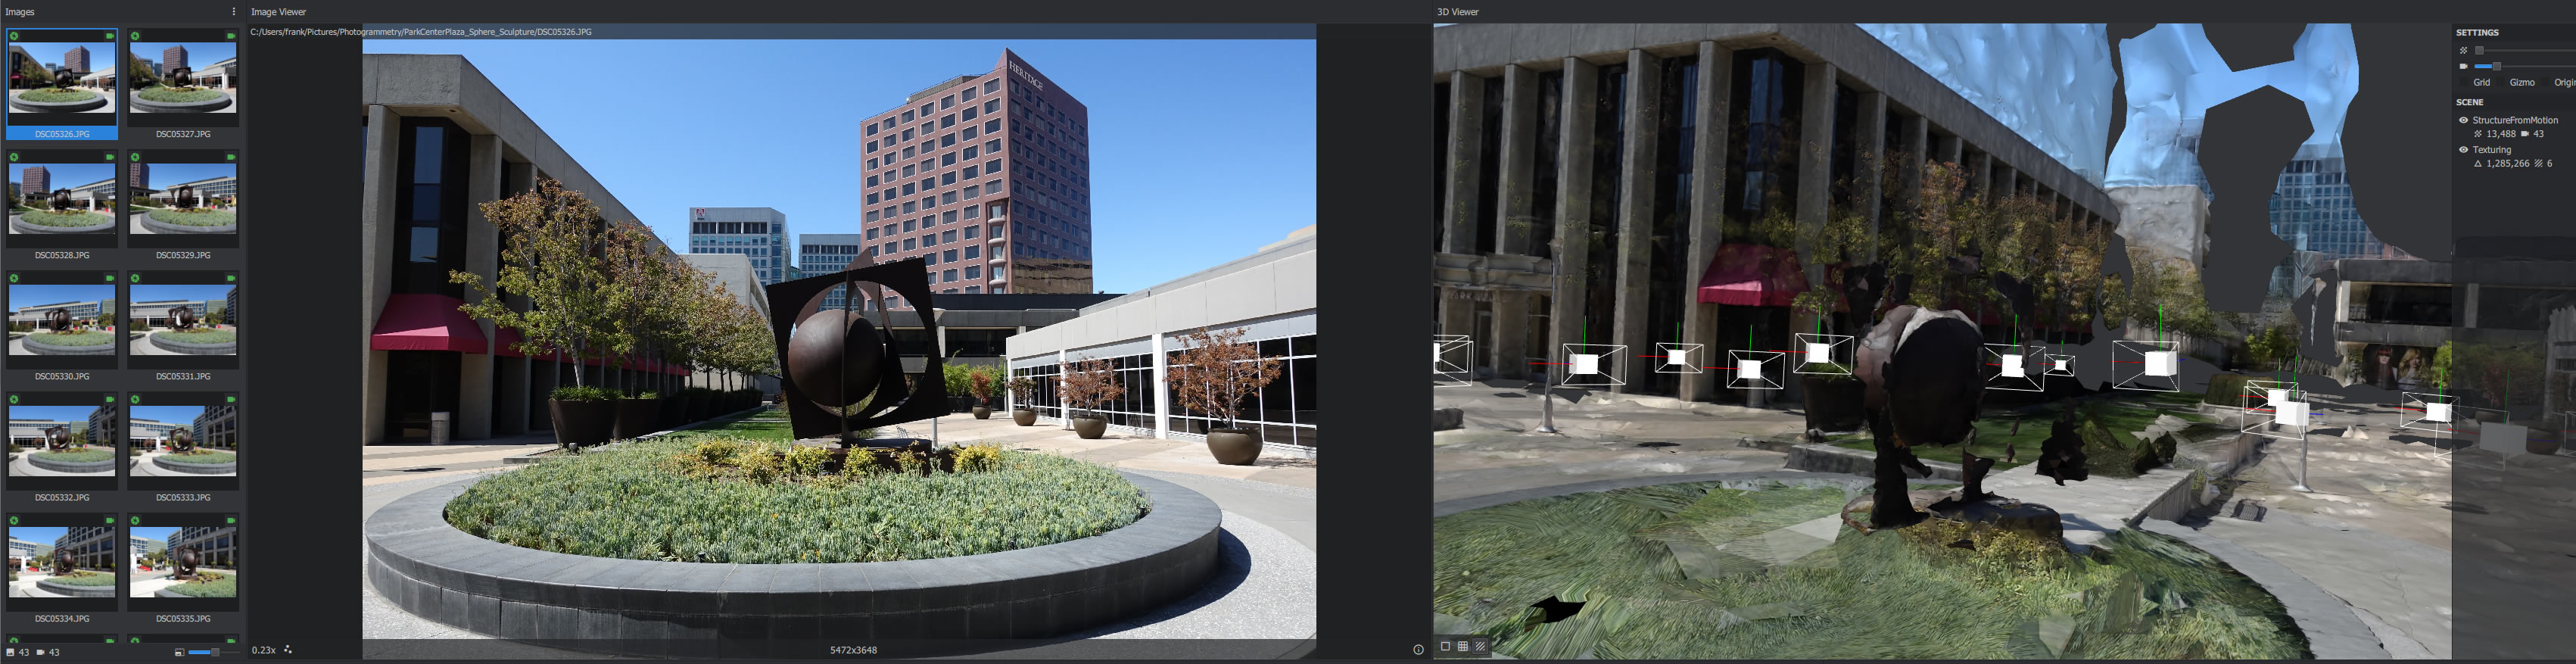
The Process
You simply need to take a bunch of pictures of the thing you want to scan. Go around it in a circle, generally, one loop at eye level, one loop from the top looking down, one loop from the bottom looking up. Taking additional pictures will improve the model quality. Since some objects are very tall, it might be hard to place the camera directly above the object, which means you should at least try to take more pictures from the highest position you can reach. Also watch out for hidden areas of the object, nooks and crannies, take additional pictures of those areas.
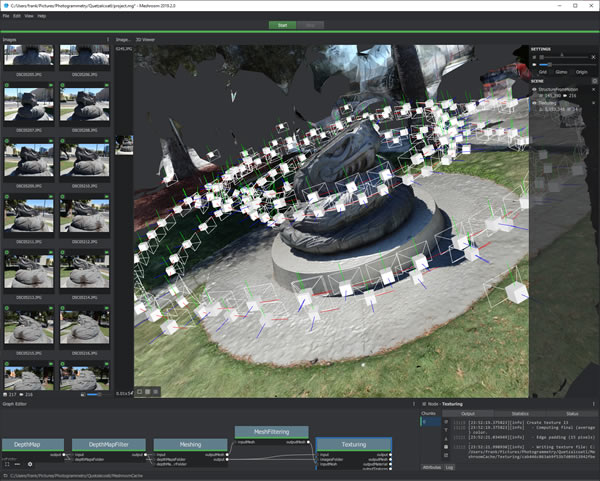
Once you have taken the pictures, toss it into Meshroom, the default settings should be fine, and simply hit the start button. Once it’s done, you’ll get a OBJ file, MTL file, and a bunch of image texture files.
You need to import the OBJ file into Blender to do additional cleanup.
Cleanup involves…
Rotate and center the model
Delete all the parts you don’t want
Decimate the mesh (lowers the mesh count, makes the model a smaller file size)
Delete all loose/orphaned objects
Fill any holes (optional, for 3D printing)
Rescale, rotate, and center
Fill large hole at the bottom (optional, for web upload)
Shrink the texture images (optional, for web upload)
That’s really it, but there are intricacies and caveats.
How Photogrammetry Works
Meshroom will show you a processing pipeline graph at the bottom of the screen that shows you the steps.
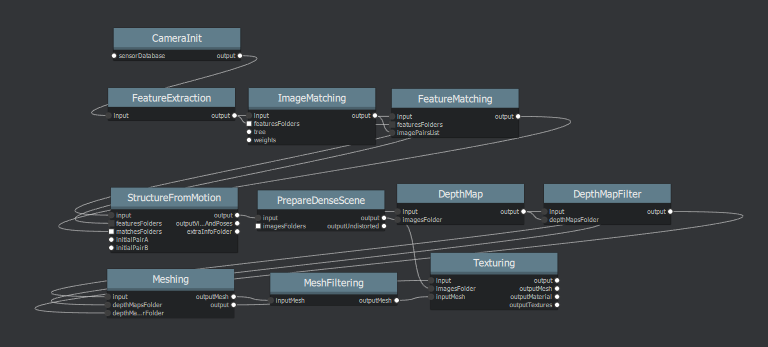
I’ll try and explain the important ones briefly.
Feature extraction is when each image is analyzed for features, features are generally a place where colours between pixels change in an unique way.
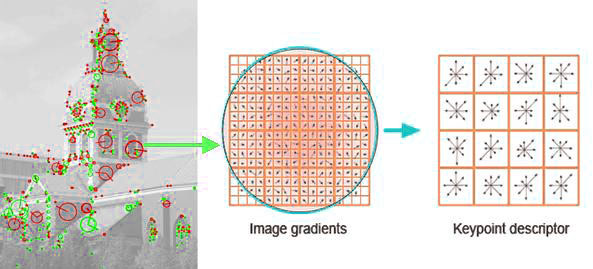
Each feature is identified with a unique descriptor so it can be matched up against features from other photos. For pairs of photographs, feature matching is performed. This technique is also commonly used in making panoramic pictures.

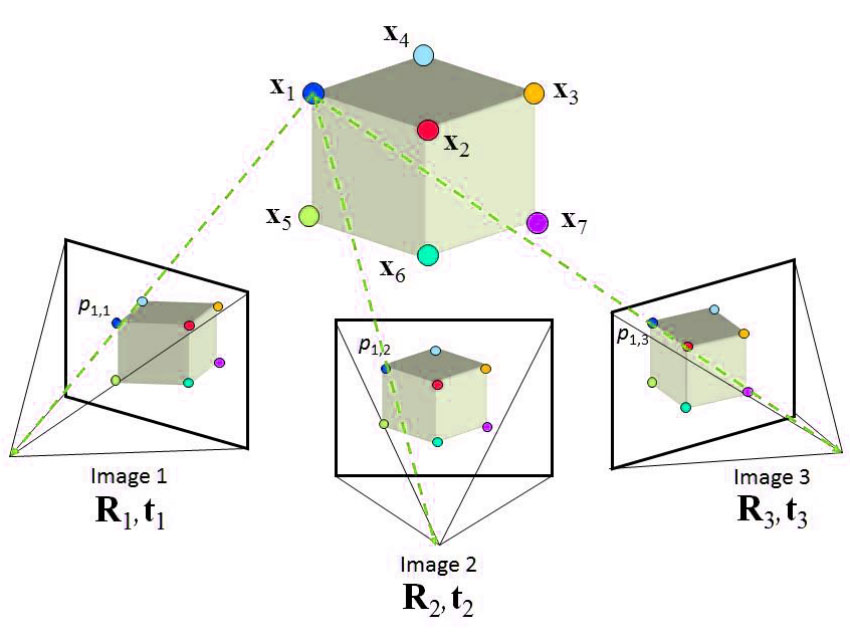
Matched features are used for Structure-from-Motion (SfM), where the positions of the matched features are used to calculate the 3D coordinates and orientation of the camera.
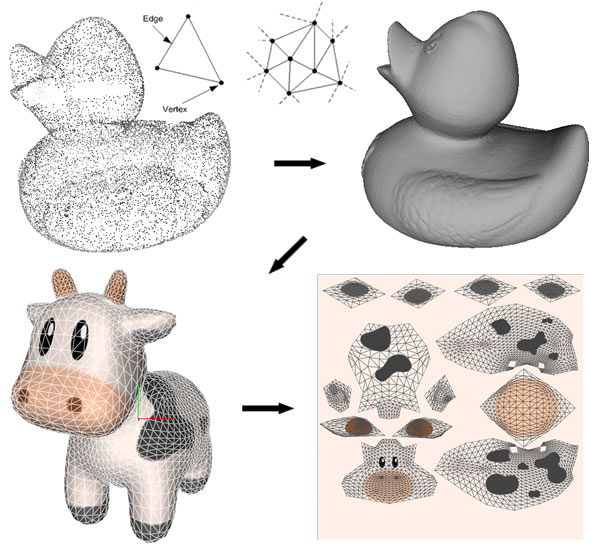
Sometimes these matched features are too sparse so the step called “PrepareDenseScene” adds in more points via interpolation. “DepthMap” uses the points to generate a point cloud. “Meshing” generates a mesh from the point cloud. Finally, the colourful photo data is projected onto the mesh in the final “Texturing” step.
Incredibly, Meshroom takes care of all of this for you, for free, as free and open source software.
Tips, Tricks, and Rules
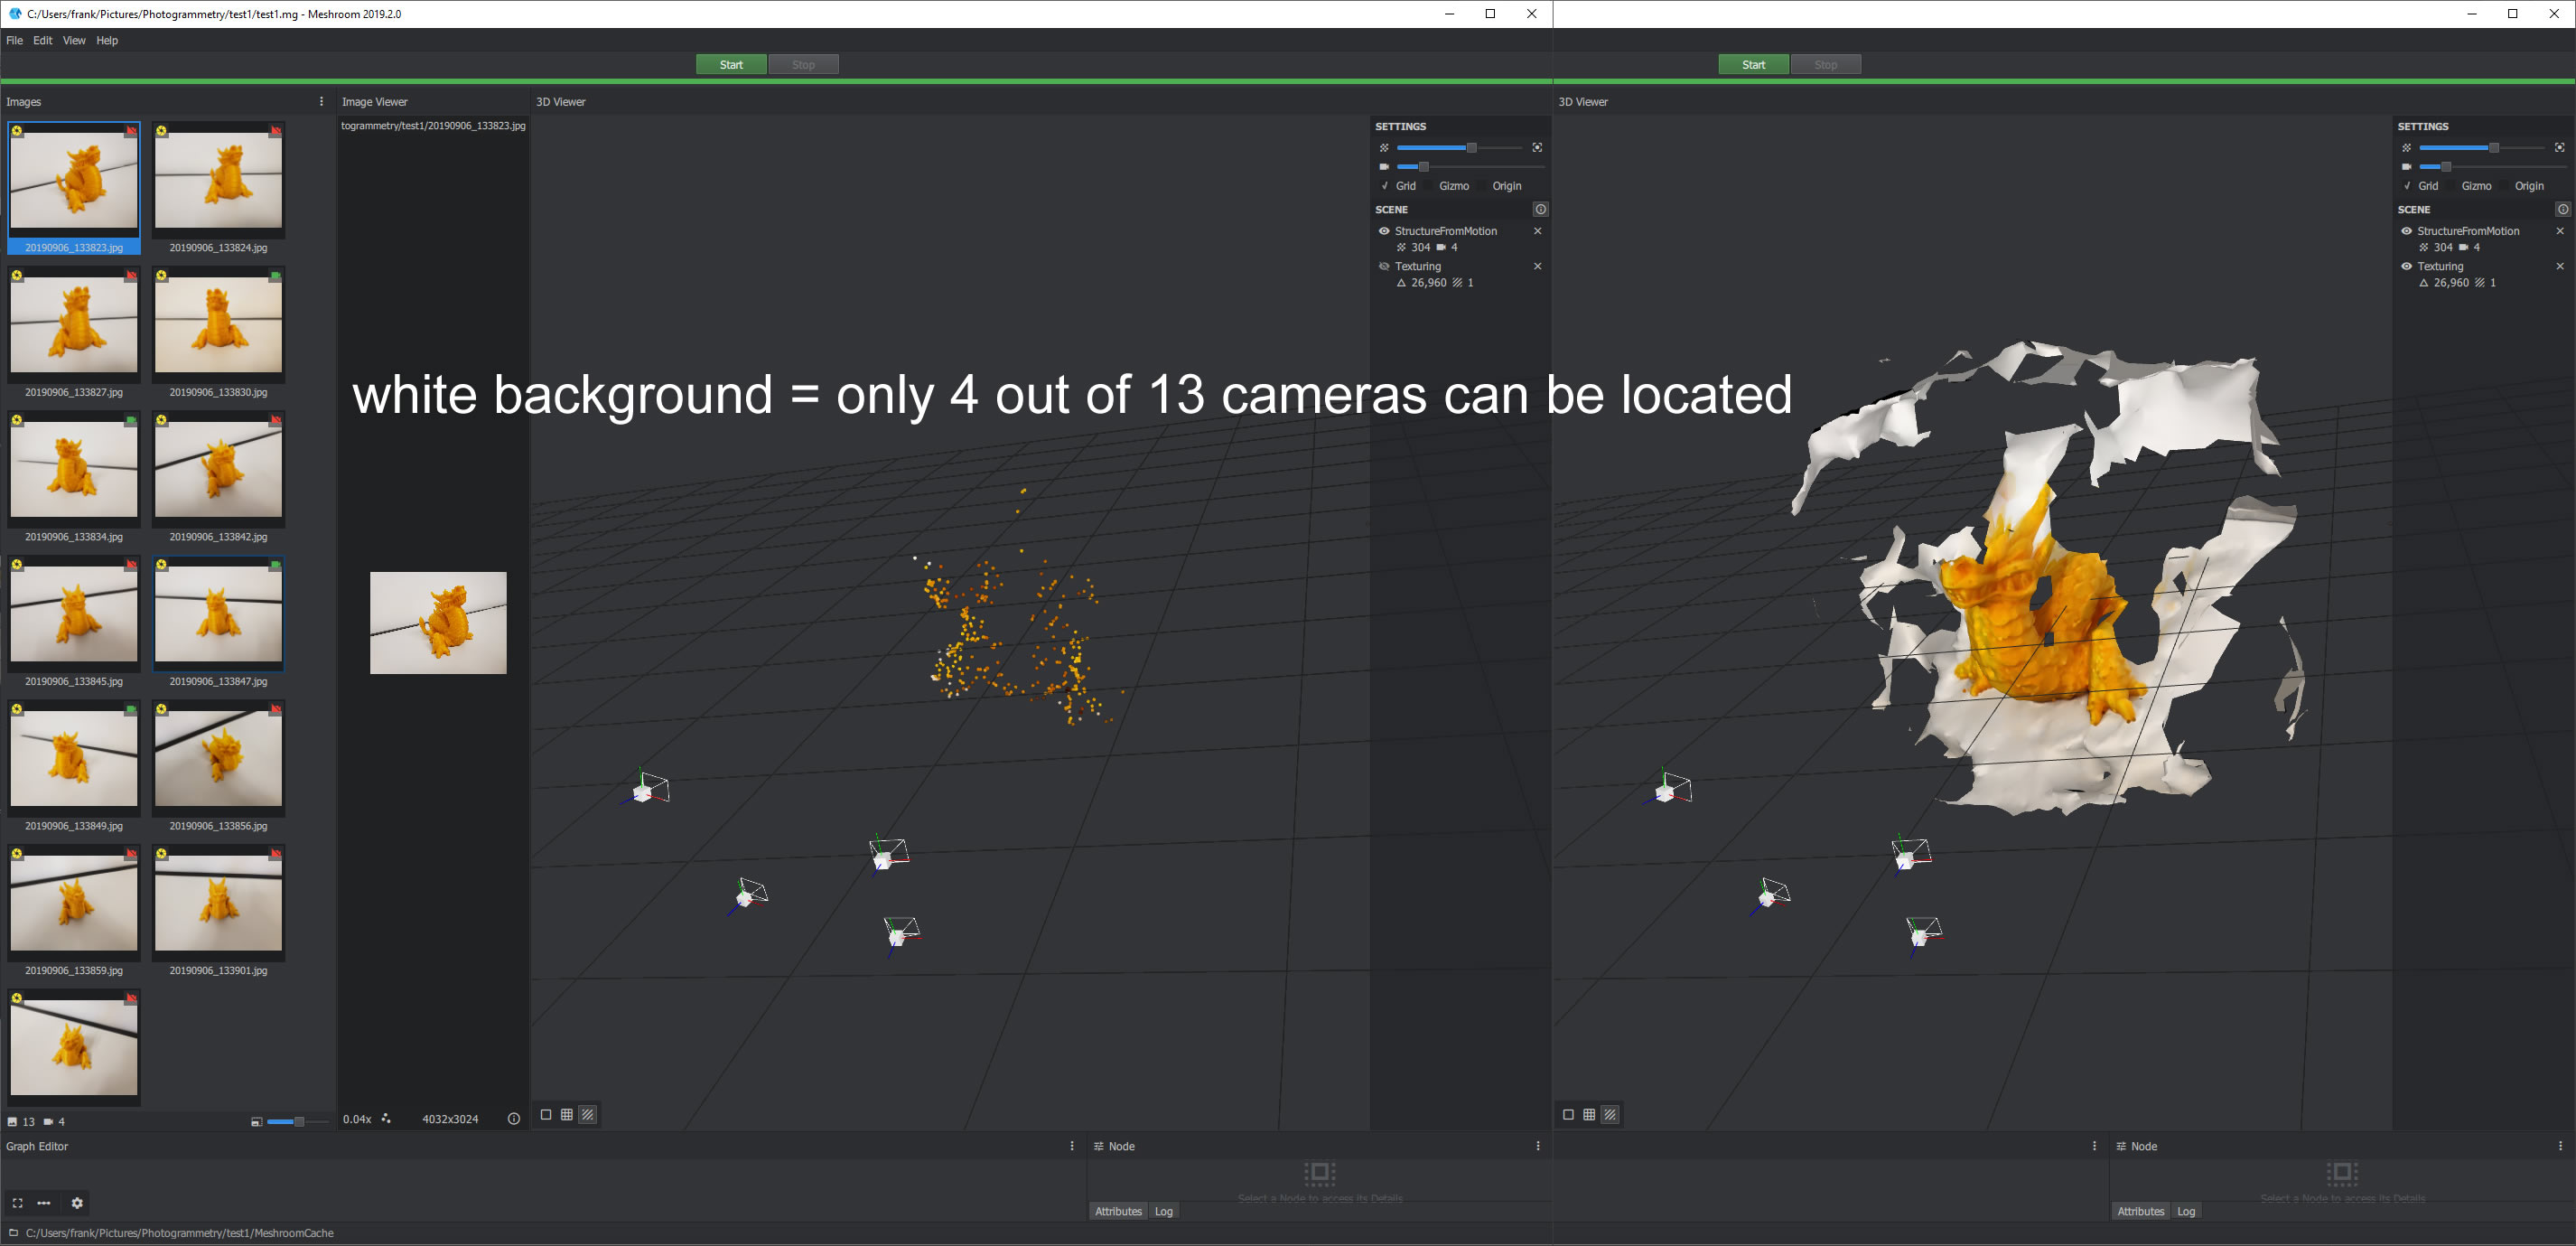
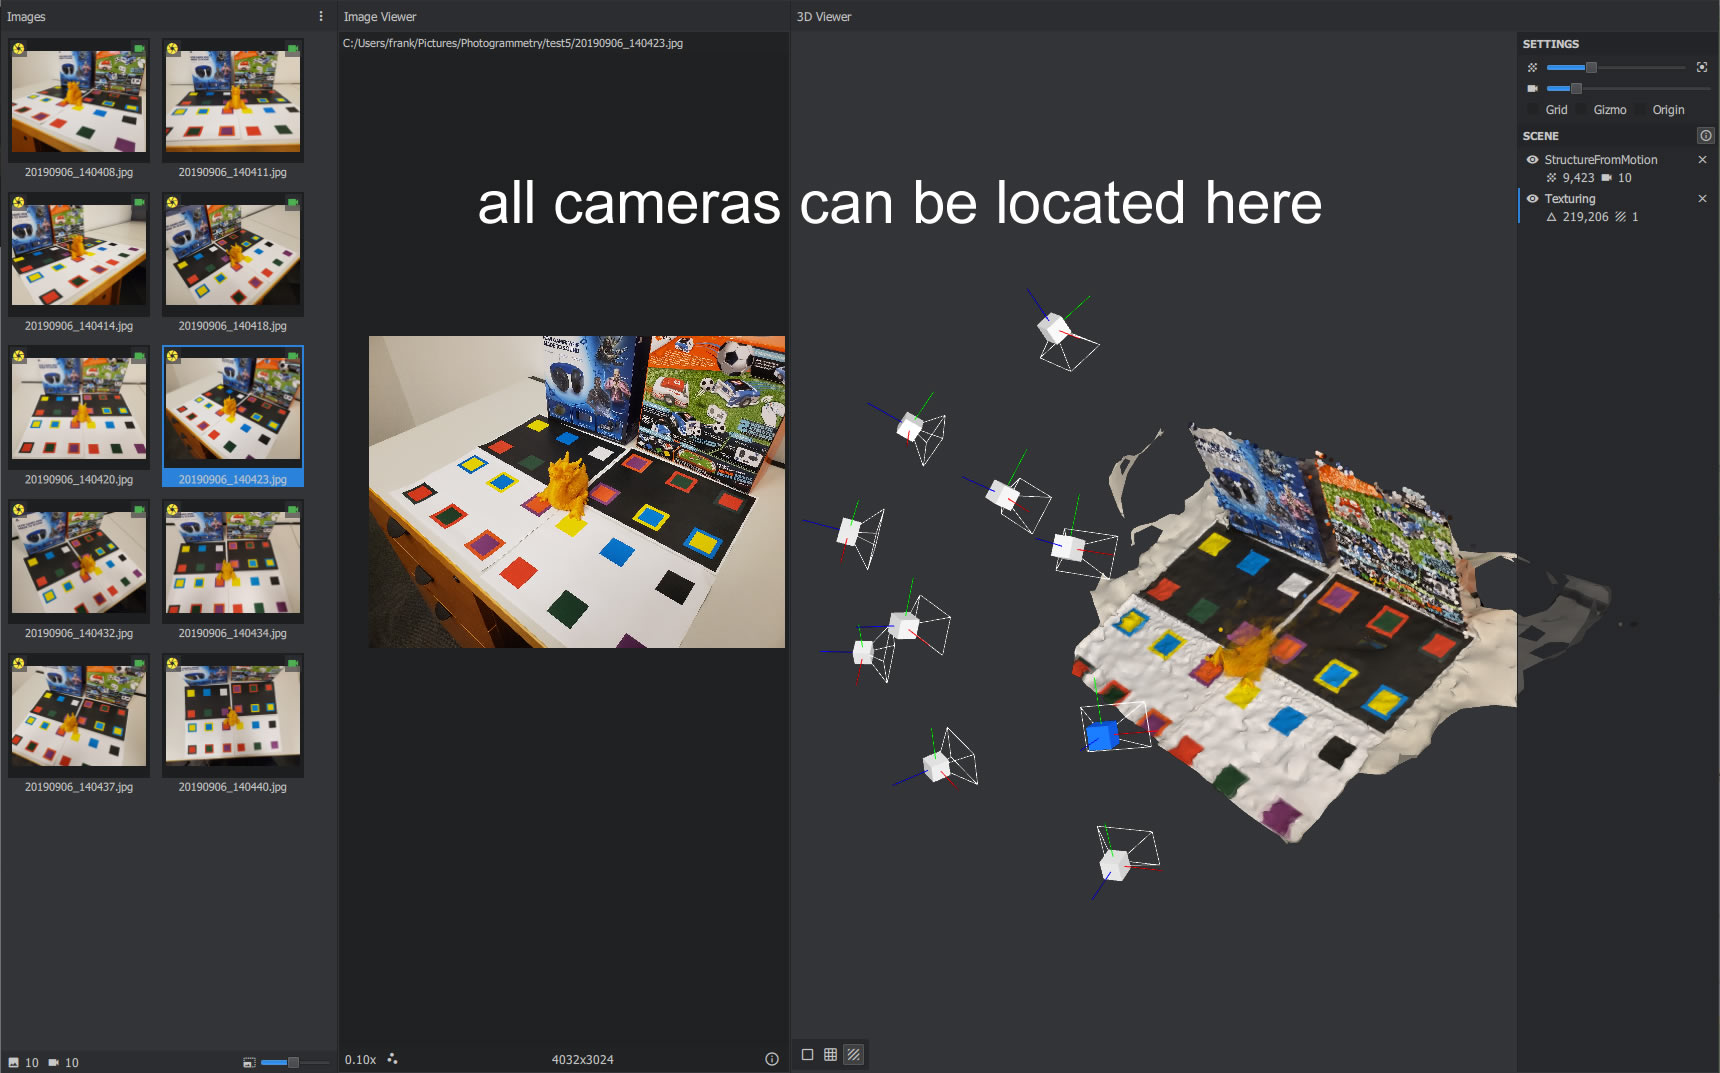
Always remember that the photogrammetry algorithm needs to see the same “features” in many images in order to compute the position of your camera! This means moving objects in the background will cause errors, and this also means reflections will cause errors. A crowded location, too many cars, or shiny objects will cause problems. In an outdoor environment, look for some good features to include, such as a tree, bench, garbage bin, fire hydrant, light post, parked car, etc etc.
For indoors, never use a plain white backdrop because there’s nothing that the algorithm can use to tract the position of your camera. A bookshelf is actually an excellent backdrop. Do not ever move or rotate anything in the room, only move the camera!
I have prepared two tests that show you what happens when you try to use a white background vs a “good” background:
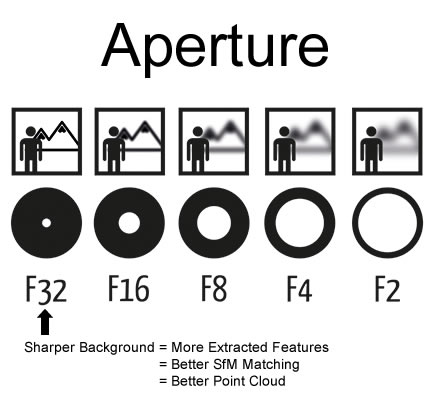
It is also difficult for the algorithm to find features on dark surfaces, or flat surfaces without textures. It also has trouble with thin objects too.
I used my RX100 camera for this. I can narrow down the aperture to get a sharp image without background blur, bokeh is actually bad in our situation. It also has a flip-up-down screen to make it easier to take images from above and below. But a smartphone should work fine too. Keep the camera settings consistent between shots, especially the focal length, zoom, and aperture, otherwise the software will simply reject the photos.
Since you need to keep some background features in view for the camera position to be calculated, you need to be careful when taking super close-up pictures. Try and give the algorithm something to track still in the view.
Do not use a camera flash mounted on your camera! The algorithm can handle shadow from the sun because it doesn’t move, but if the shadow moves, that’s a huge problem. A diffused flash source that doesn’t move is OK.
The ideal object is: not totally black, has some texture and colour, not too tall (unless you can use a drone), not reflective, has some good background around it, and you can walk all around it.
I like to keep an insanely high shutter speed. This allows me to walk around the object fast without having to put much thought into steadying my hands. With a tiny aperture but on a sunny day, this means you should not be afraid to keep your ISO fixed at a high value like 800. Image noise isn’t that big of a deal.
I don’t own a CPL filter to test with but I think it can help with reflections, but don’t depend on it, I suspect the tiniest things can confuse the SfM algorithm.
More Cool Screenshots
Quetzalcóatl
Camera positions and final model, including the surrounding cars and trees
This sculpture is a bit tall so you can see I did more close up circles with my arms raised really high up.
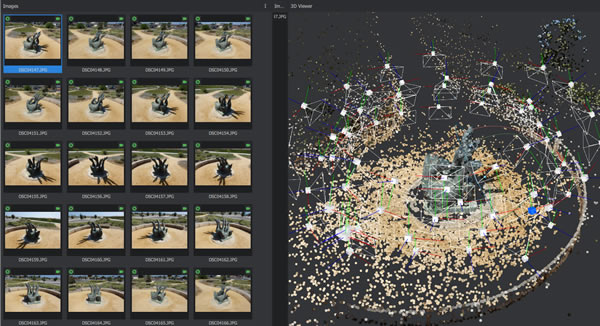
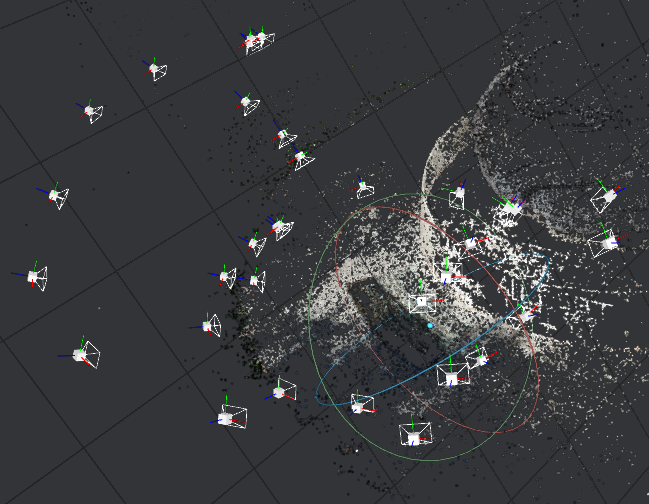
Geese at Shorebird Park
SfM matched feature points shown, not the final mesh
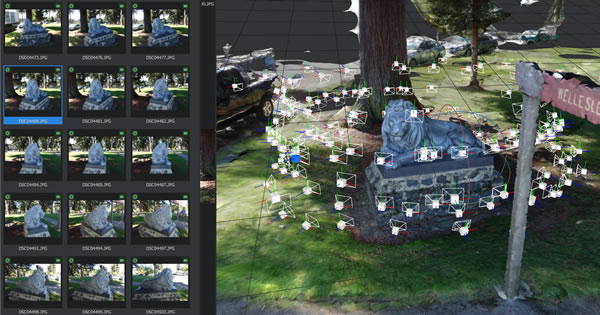
Lion in Wellesley Crescent park
Camera positions and final model, including the surrounding cars and trees
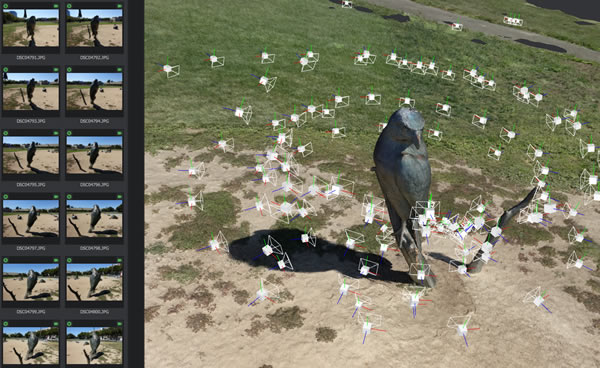
Bird at the Discovery Meadow
Camera positions and final model, including some of the ground
My Experience
I feel like 100 photos of an object is enough to get a 3D printable model, seeing as how the printer’s resolution can’t show off too much detail anyways. You can go as low as 50 if you want. What I’ve been doing is take maybe 300 pictures, about 150 of them will contain the object I want to focus on, the rest will roughly capture other objects, such as the second lion and stone benches in the park. This generates a complete scene of the park.
100 pictures will take roughly 1 hour to process on my computer, which has a 6 core i7 and a GTX 1660 graphics card. With default Meshroom settings, your final OBJ file will always be around 300MB, cranking up the mesh limits will push that to more than 600MB. The intermediate files will take up a lot of disk space too, several gigabytes. WARNING: since there’s a mesh point limit, you will lose details on your “main subject” as you capture more photos of the surroundings.
It’s pretty painful to use Blender to clean up the model. I’ve described the steps already (see above) and the worst part is trying to close large holes. Blender can’t seem to detect the large hole at bottom of model (the model always have a big hole, unless your model is levitating in mid air). I found a strategy that seems to be OK, and that is to decimate the bottom of the model much more than the rest, so there are much less edges to select. Once you manually select the edges at the bottom, simply press “F” to fill it. (the “select loop” option helps but still often fails to capture the entire loop, even if you don’t have dangling edges)
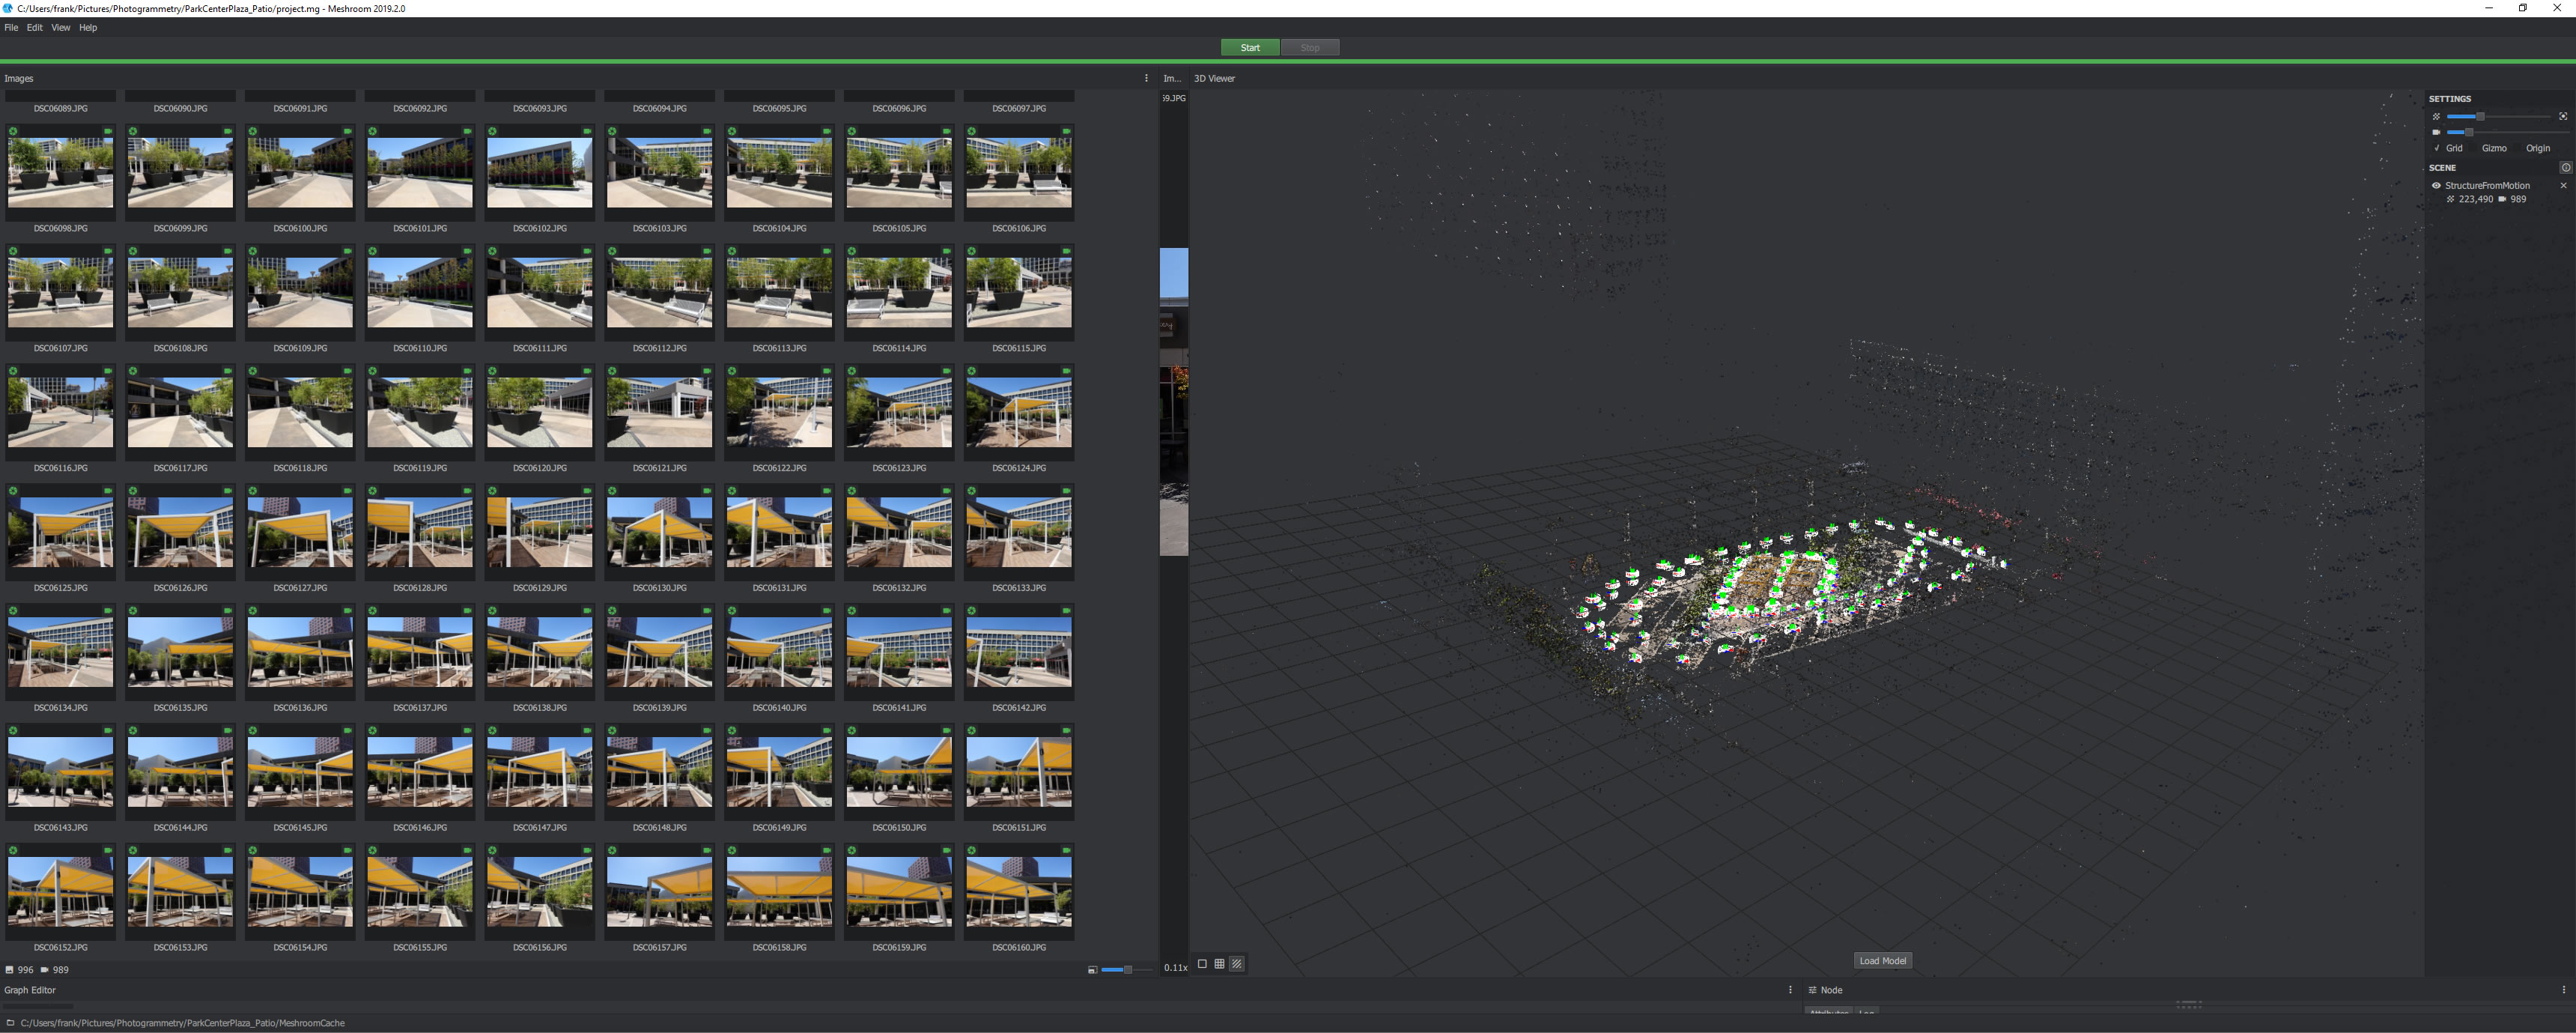
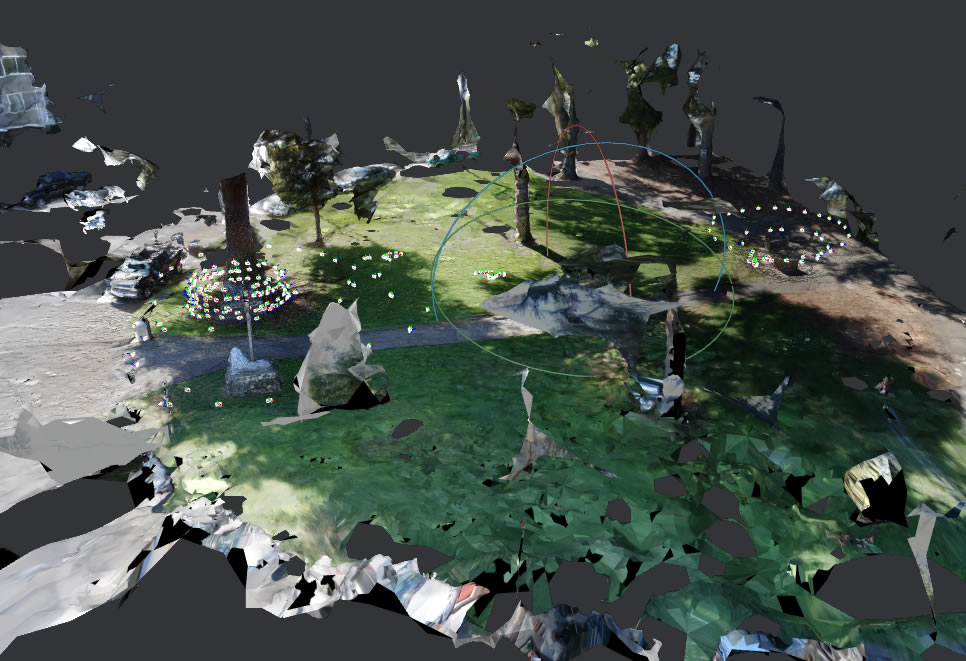
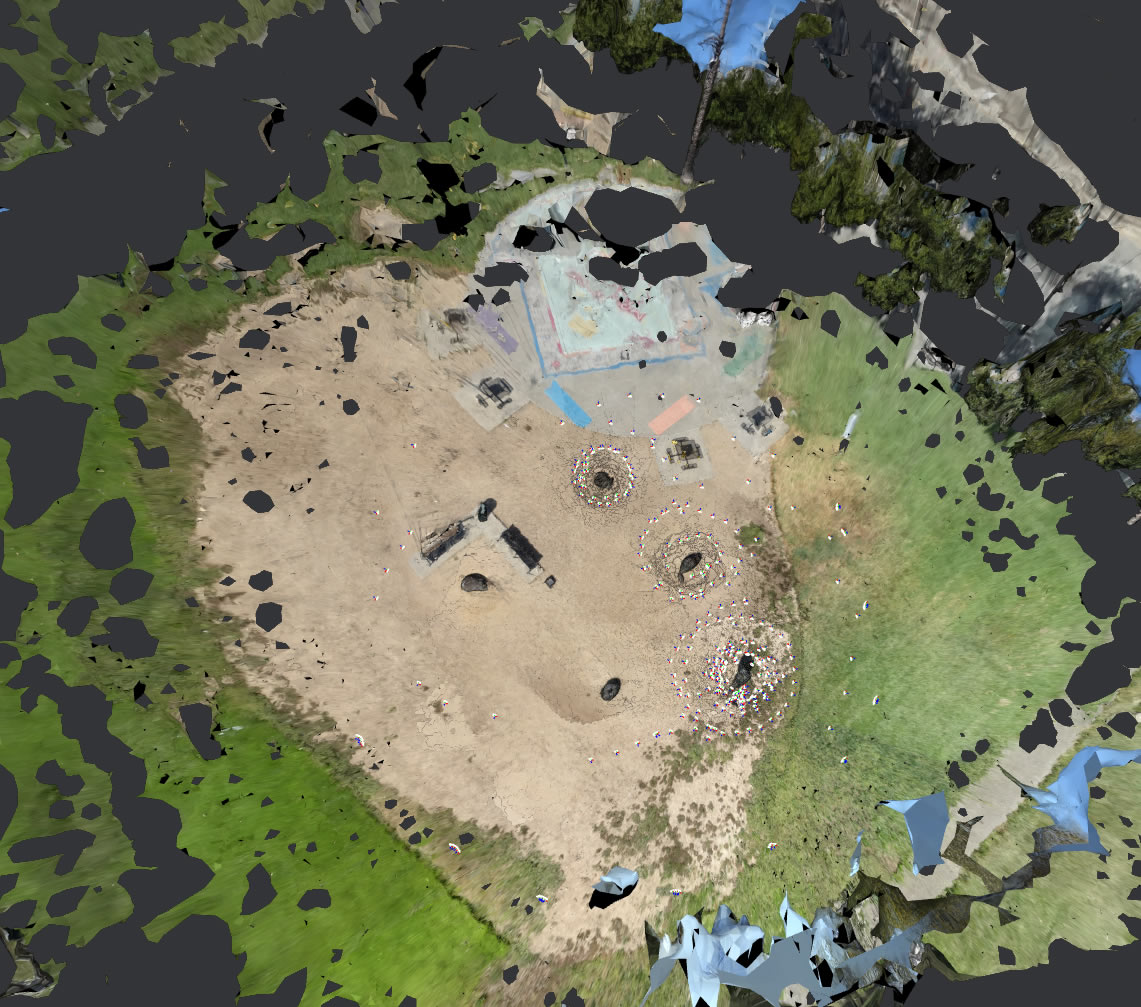
Plaza Courtyard
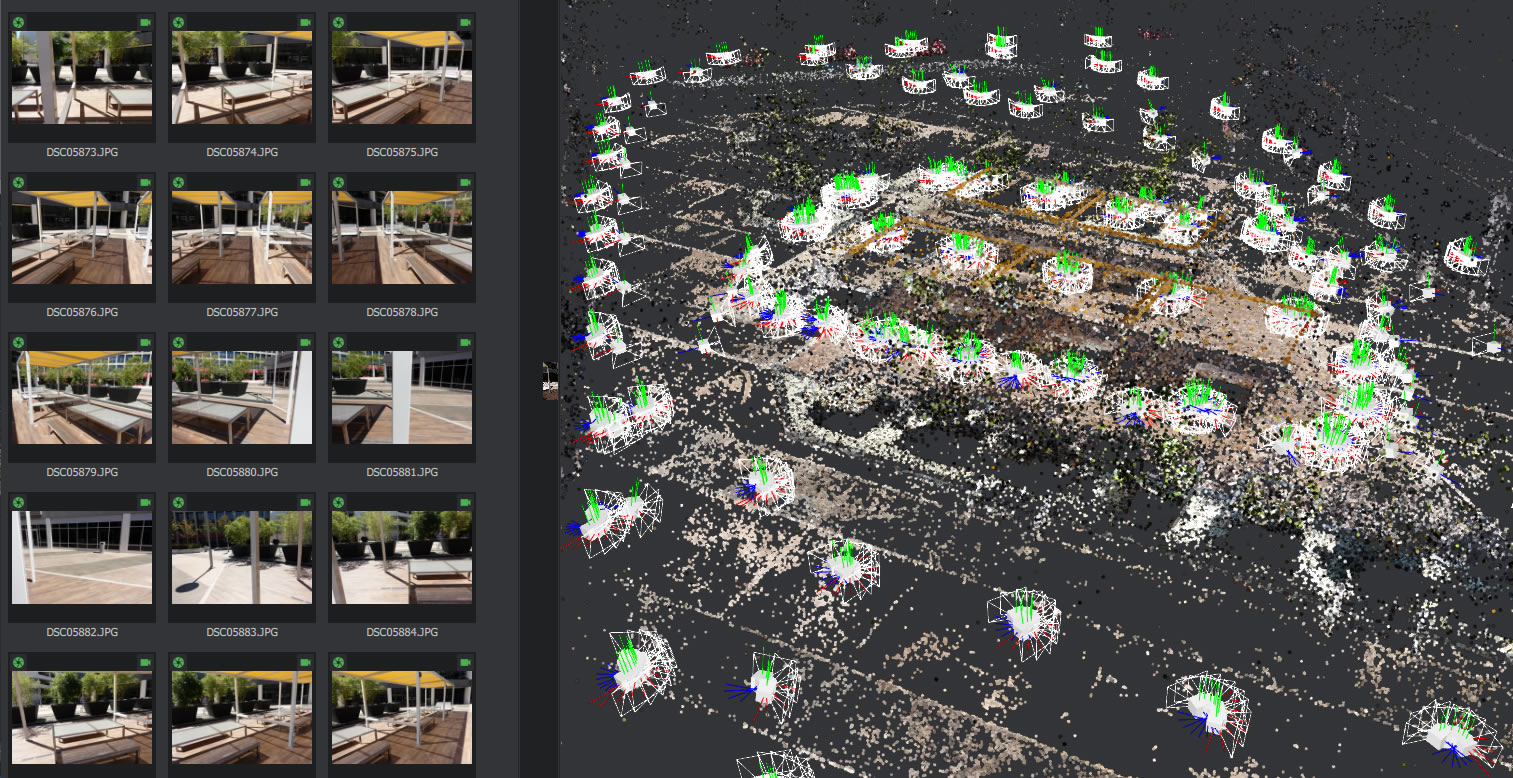
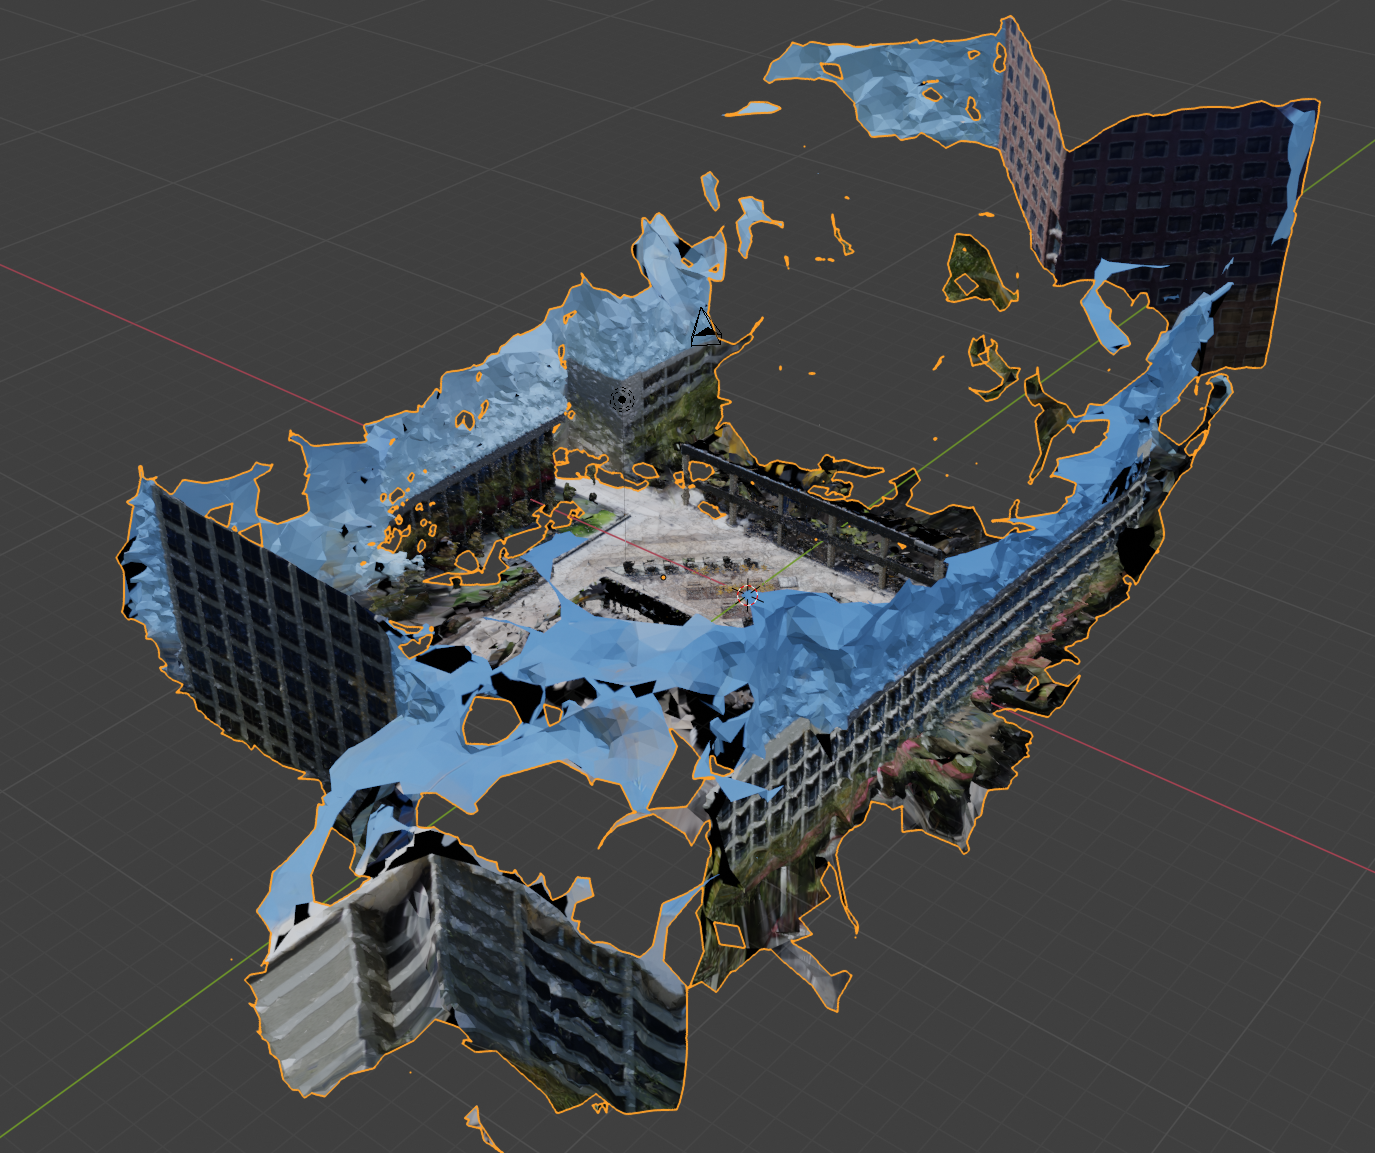
I tried to push the limits a bit, on Labour Day, I found a deserted courtyard with large flower pots and patio tables under a canopy. I thought it would be cool to try and generate a virtual environment with photogrammetry. To be sure that I got enough data, I took 900+ photos over the span of half of an hour… Tossed the data into a desktop at work with a octo-core i9 and RTX 2080. It took three days to process! The next two screenshots show just how many pictures I took, and the SfM feature match points.
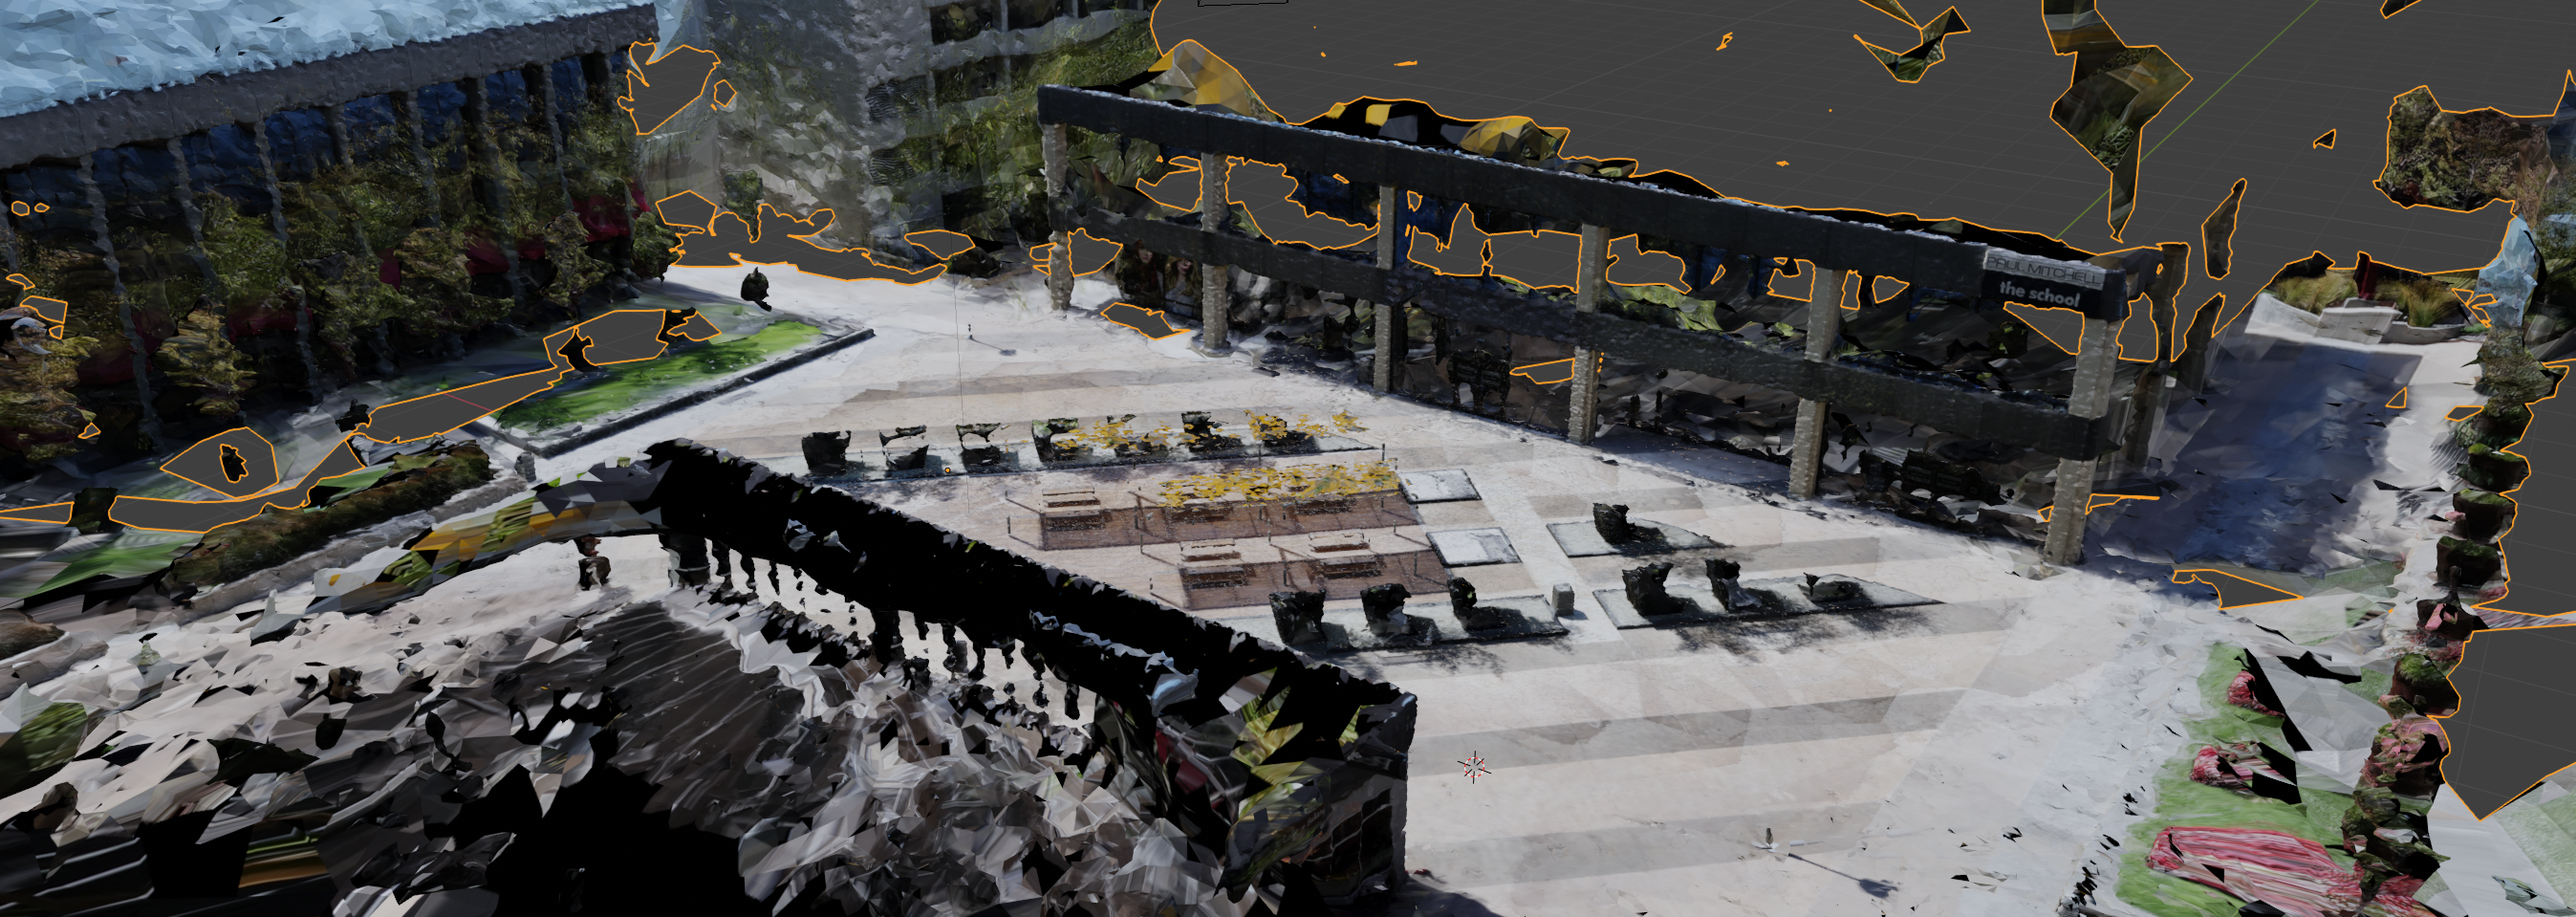
After meshing, I got disappointing results… The tables and canopy did not get meshed at all, and a lot of the flower pots were missing chunks. The surrounding buildings did get modeled well, which is a waste of polygons.
The problem is that the table tops and canopy were flat and not textured at all. The flower pots were black and so the edges are difficult to detect for feature extraction. The dark glass of the surrounding buildings also became black holes because they were black, and possibly because of the reflections.
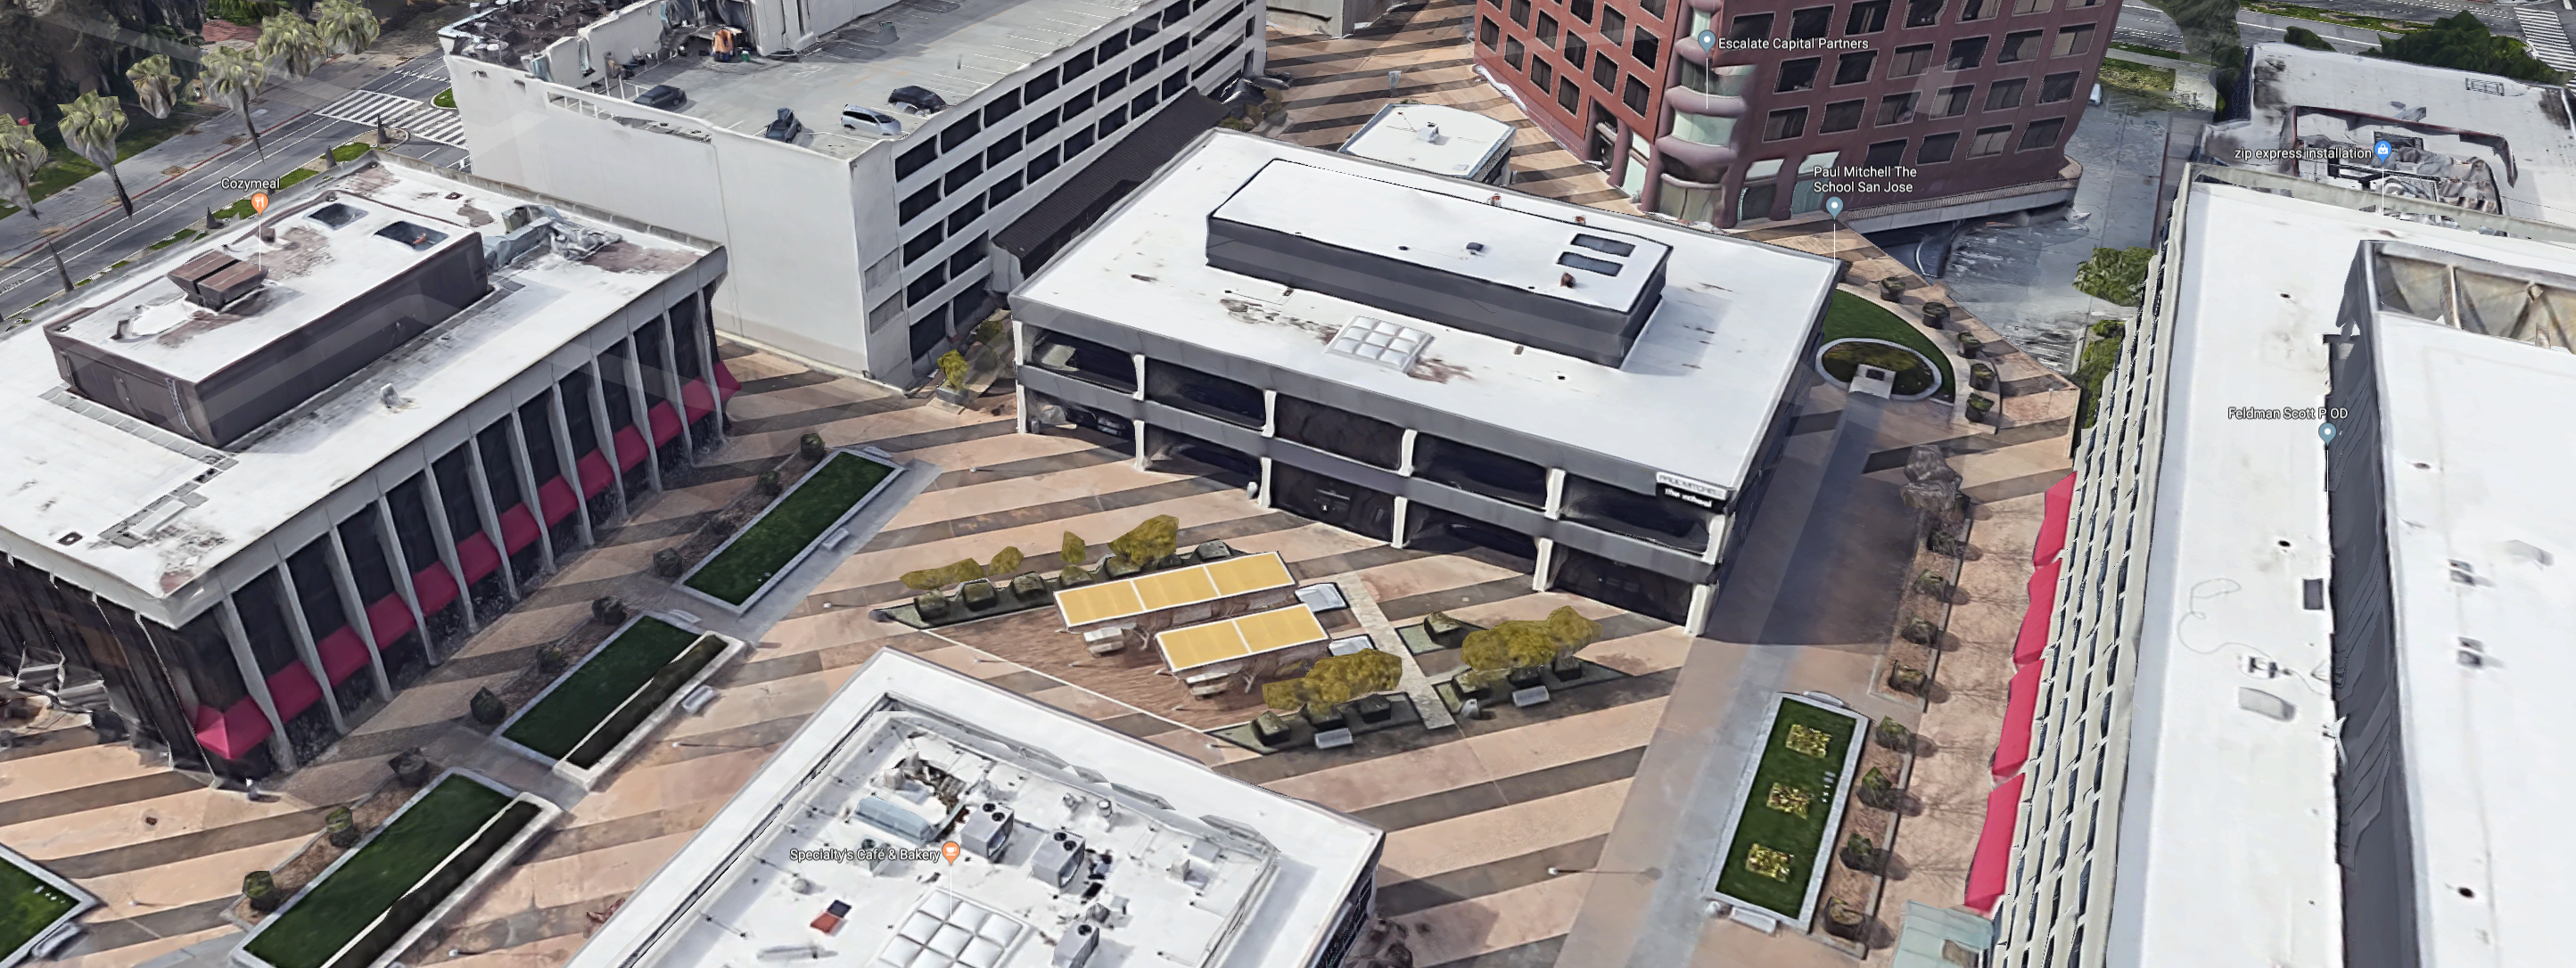
Here’s what Google Maps shows in 3D mode:
Another failure shown below (click on it), the reason is probably that the object is black and also thin.
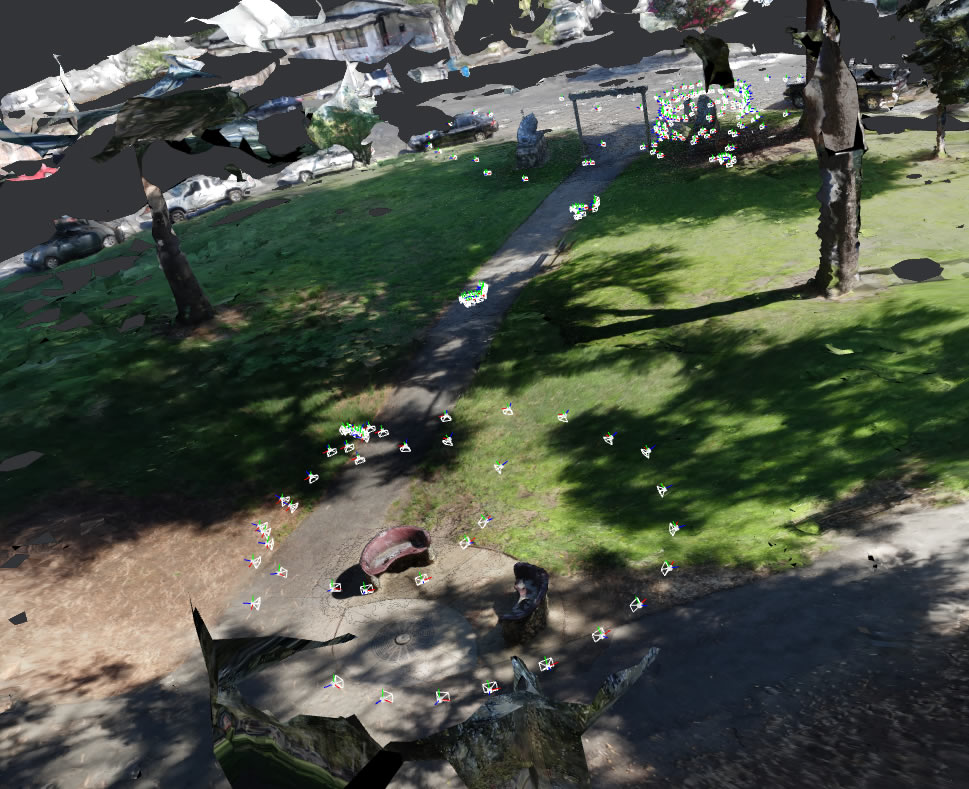
More on Environment Capture
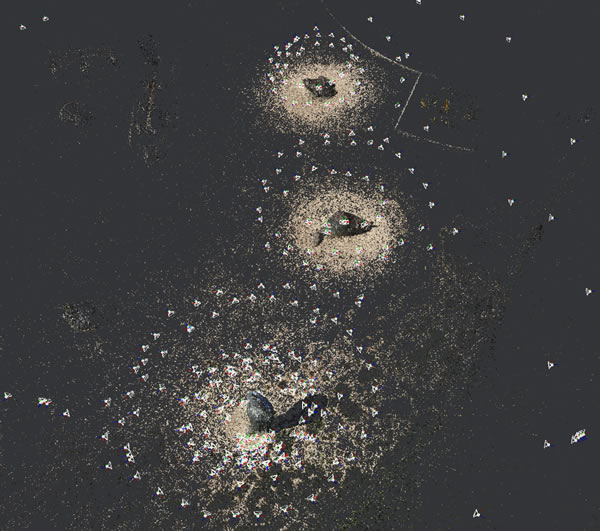
Here are some more screenshots of Meshroom showing how it captures not just the subject, but the whole environment, especially if I walk around taking pictures far away. You can see where my cameras are.
Wellesley Crescent Park
You can see me taking hundreds of pictures around the first lion statue. The second lion got a quick walk-around too. Then I did two small panoramas along the foot path. Finally I circled the benches a bit.
Discovery Meadow
I focused on the bird first, and also took a decent amount of photos of the frog and the racoon. Also did a few randomly located shots just to cover the whole park.
Sorry I didn’t capture the giant Monopoly board, but there were kids playing there.
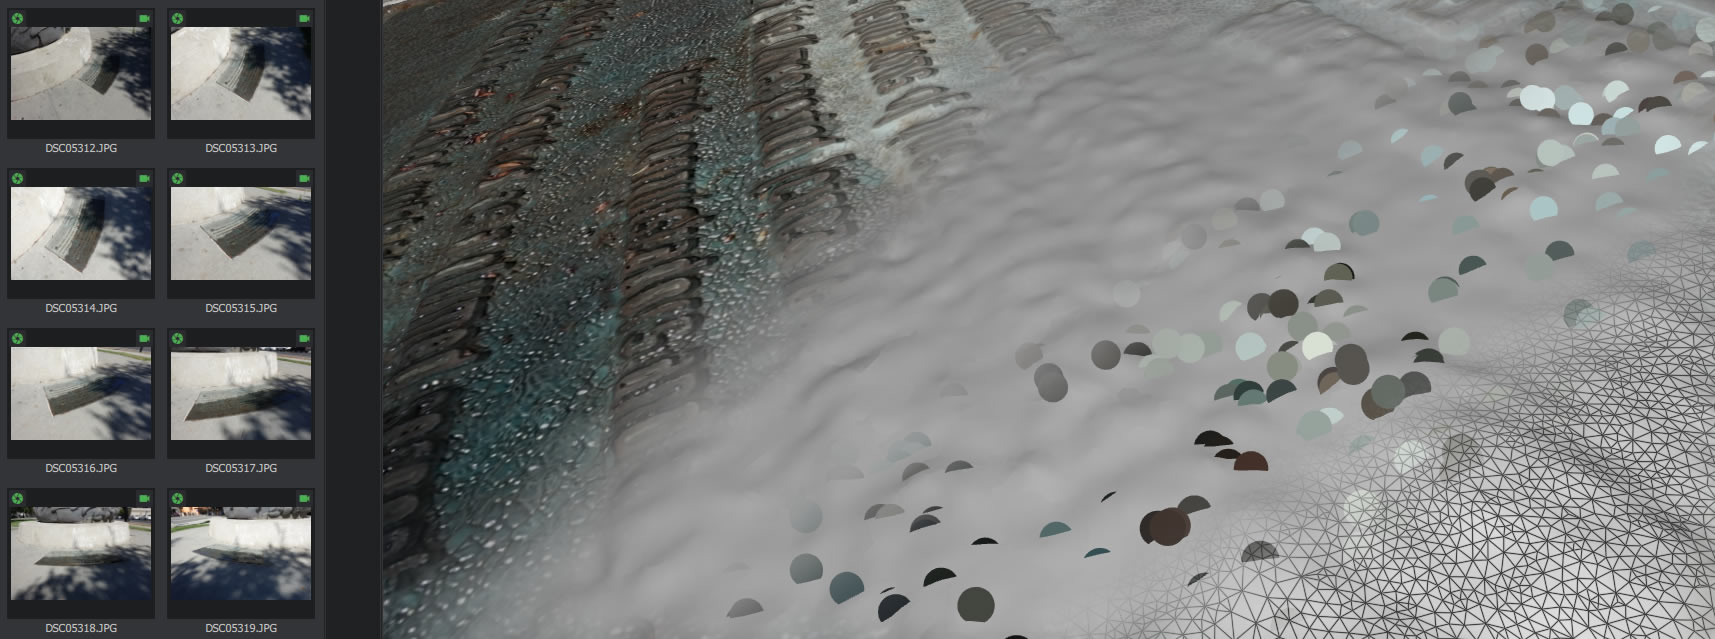
Plaque for Quetzalcóatl
There’s also a plaque on the ground beside the Quetzalcóatl. I thought it’d be interesting to capture more photos of it to see if I can get a mesh of the letters on it. Here you can see some pictures and what the SfM algorithm found:
Before anybody complains that I didn’t do any closeup shots… This is image below is a cropped section of one photo in full resolution:
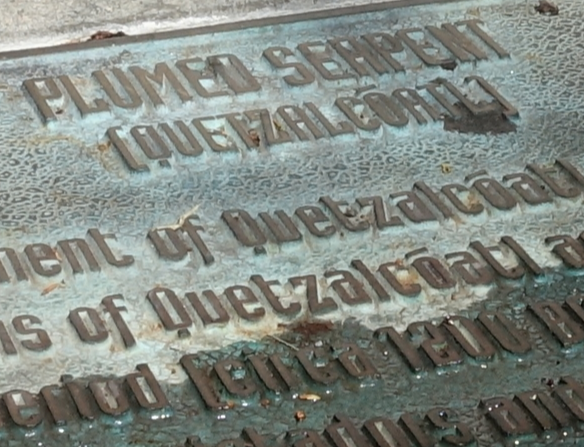
This isn’t some smartphone guys, it’s a 1 inch large 20 megapixel sensor under the noon California sun. So I did have high hopes for a detailed mesh.
And the final results… (click to zoom in) The texture, solid surface, surface mesh, and the matched image features are all shown:
Learning three.js
three.js is a JavaScript library that makes it easy to render 3D models in a web browser using WebGL. You can do some pretty incredible stuff with it, even interactive virtual reality environments (try this example).
I spent about a week building my 3D viewer (the one you clicked on when you saw my models), it’s pretty basic. I brushed up on my JS coding skills and I learned a lot about how best to decimate my 3D models and compress the texture images before putting them on my website. When you view my models, please feel free to view the page’s source code and use your browser’s developer tools to learn from it. It’s not the best code (actually it’s entirely hacked together), but it augments the example code provided by three.js documentation.
Some fun stuff I’ve ran into while doing this bit…
“1” as a distance… for an ordinary OBJ model you get without scaling, “1” is a fair distance… but when you try dumping in a STL file, “1” means 1mm, and your model becomes huge.
Different software uses either Y-is-up or Z-is-up coordinate systems… it’s really annoying
OBJ models must be watertight before they can be rendered by three.js , which is annoying because all other local viewers don’t have this issue, so the only way for me to truly check is to painfully upload it to my website first. (well… I could setup a local instance too)


